Merchant Panel - User Guide
This user guide provides instructions and explanations for using the Red Dragon Pay Merchant Panel. It has been reviewed and updated to follow industry standards in clarity, structure, and formatting.
📝 Introduction
Welcome to the Red Dragon Pay Merchant Panel - User Guide. This document is crafted to help merchants navigate the Red Dragon Pay system efficiently from account registration to managing transactions and viewing performance reports.
🔍 What is the Red Dragon Pay Merchant Panel?
The Merchant Panel is your dedicated control center within the Red Dragon Pay platform. It allows merchants to securely manage payment links, track transactions, view sales and refund reports, initiate payouts, and monitor account performance in real time.
🎯 Who Should Use This Guide?
This guide is intended for:
- Business Owners and Operators
- Merchant Account Managers
- Finance and Accounting Teams
- Technical Support Teams
📚 What You'll Learn
Inside this guide, you'll find instructions for:
- Creating and managing your merchant account
- Understanding your dashboard and transaction reports
- Generating payment links and invoices
- Viewing and exporting sales, refunds, and settlement data
- Initiating and tracking payouts
- Accessing analytics and performance summaries
- Handling chargebacks and disputes
This guide is designed to support both new and existing users of Red Dragon Pay, providing all the information you need to effectively navigate and maximize your Merchant Panel.
1. Merchant User Guide
🔹 Step 1: Login to Merchant Dashboard
Click here for Login and enter your email and password to access the dashboard.

After login, the merchant will be redirected to the dashboard.
2. Dashboard
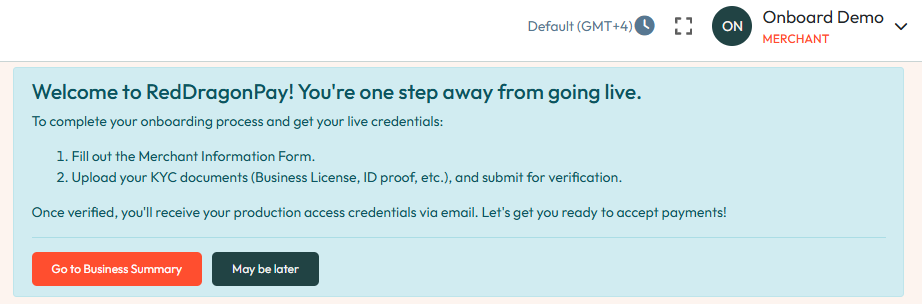
Note: At the top of the dashboard there is a notification area for document upload. If no document is uploaded by the merchant, a message appears with two buttons: Go to Business Summary and Maybe Later. Click the button you prefer. If you are ready to upload now (recommended), proceed to the Business Summary section.
Description:
Provides an overview of the platform's transaction performance, including success/failure metrics, refund, invalid, chargebacks, and analytics.
Steps to Use:
- Navigate to Dashboard in the left sidebar.
- Select a date range from the top date picker.
- (If applicable) Filter by Merchant and Currency.
- Review metric cards and analytics.
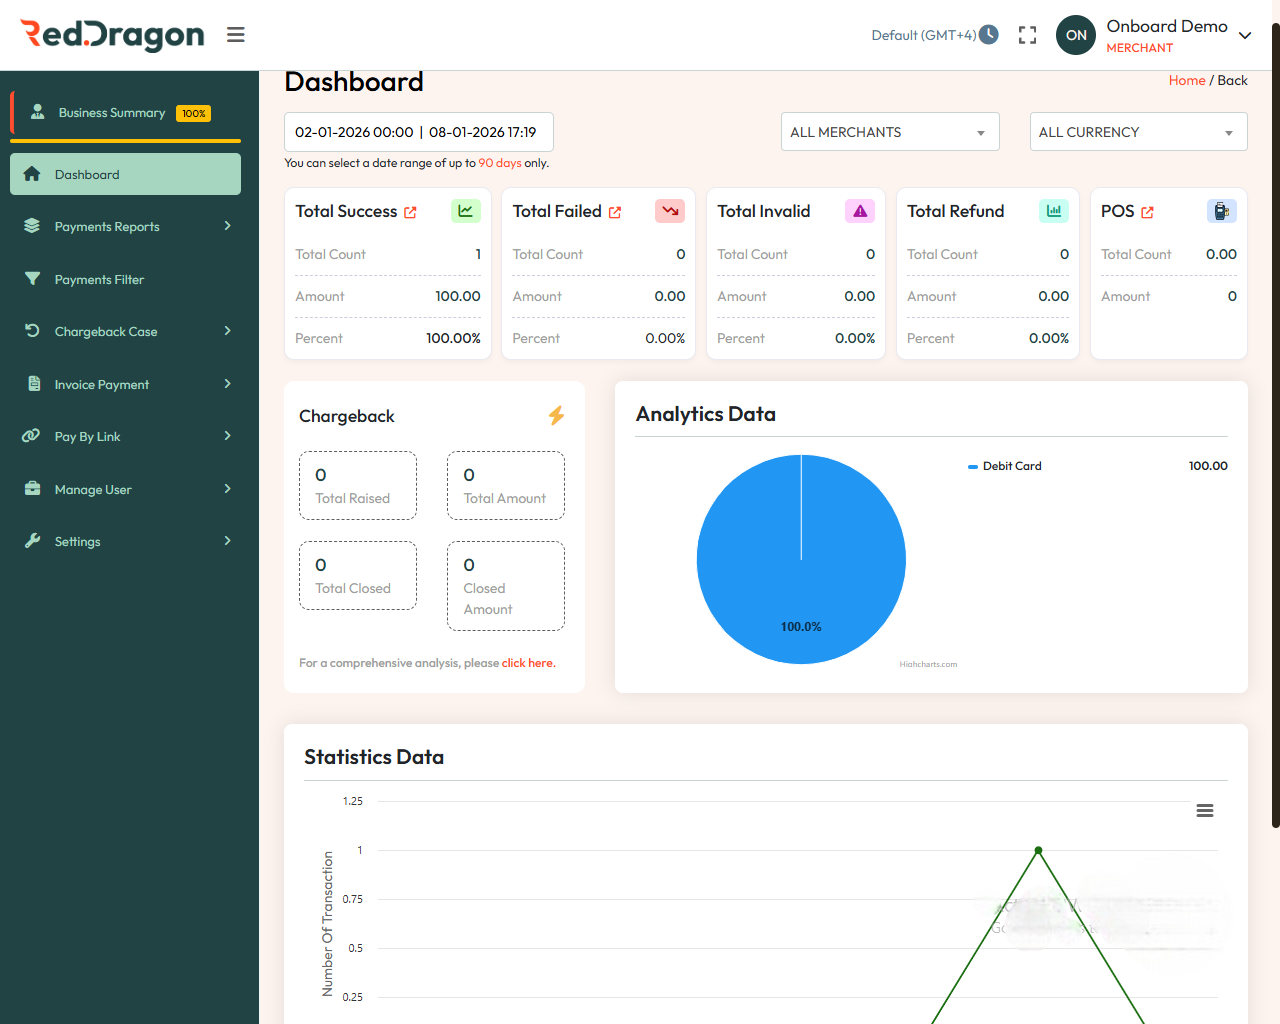
Metrics Displayed:
- Total Success / Total Failed / Invalid / Refund / POS
- Chargebacks (Raised, Closed, Amounts)
- Analytics Data
Notes:
- Merchant access is limited to their own data for enhanced security.
- Redirection is enabled on chargeback analysis link.
3. Payment Reports Guide
This guide explains the features and tools available under the Payment Reports section of the Red Dragon Pay Merchant Dashboard.
📘 Common Field Glossary (Shared Across All Reports)
- Field - Description
- Txn ID - Unique identifier for each transaction.
- Internal ID - Internal system-generated reference ID.
- Order ID - Unique identifier assigned to each order.
- Txn Date / UTC - Date and time when the transaction was created (local and UTC).
- Settlement Date / UTC - Date and time when the transaction was settled.
- Customer Email - Email address of the customer who placed the order.
- Customer Name - Full name of the customer.
- Business Name - Merchant/business name associated with the transaction.
- Payment Method - Method used (e.g., Card, UPI, Net Banking).
- Card Number - Masked card number used for the payment.
- Currency - Currency used (e.g., INR, USD, SAR).
- Order Amount - Total amount of the order.
- Refunded Amount - Amount refunded to the customer.
- Available Amount - Balance amount remaining after refund.
- Status - Transaction status (e.g., Success, Failed, Cancelled).
- Txn Type - Indicates whether the transaction was a Sale or Refund.
- VAT - Tax applied to the transaction.
- MDR - Merchant Discount Rate applied.
- Acquirer Response - Response returned by the acquirer/payment gateway.
3.1 📘 Sales Report
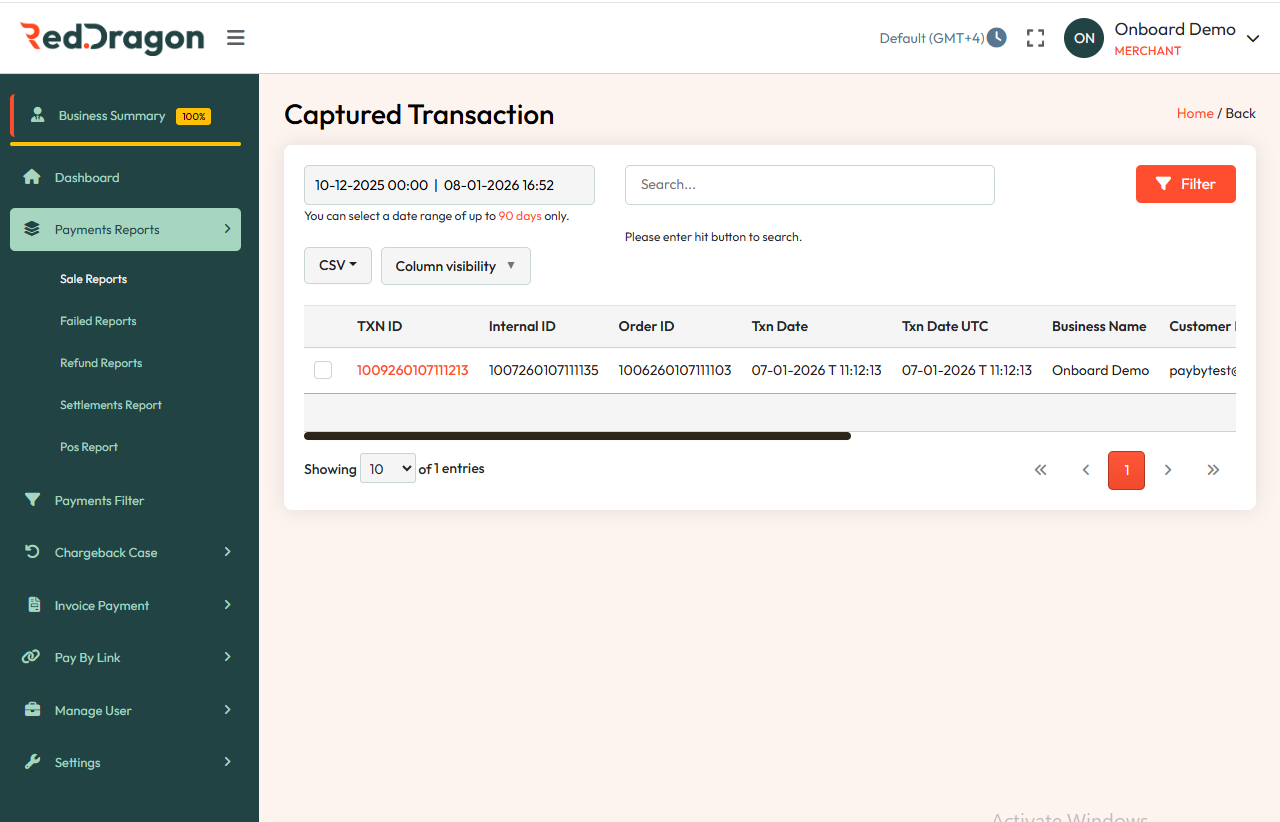
A Sales Report is a record of all successfully captured transactions processed through the payment gateway. It helps merchants track order IDs, transaction details, and amounts for reconciliation and business reporting.
Navigation:
Go to: Payment Reports > Sales Report
Direct Link: Open
Filters
- From Date and To Date for date range.
Search Tools
- Search by Txn ID, Internal ID, Order ID, Customer Email, Card Number.
- Filter by Payment Method and Currency.
Export Options
- Download as PDF or CSV.
- Use Column Visibility to hide/show fields.
Practical Use Cases
- Reconciliation - Match TXN ID with your Order ID.
- Audit - Use UTC timestamps for standardized logs.
- Support Cases - Share TXN ID with support when raising disputes.
- Business Summary - Monitor successful sales over a selected period.
3.2 📘 Failed Report
A Failed Report is a log of all unsuccessful or declined transactions. It helps merchants identify errors, payment declines, or customer issues for troubleshooting and support.
Navigation:
Go to: Payment Reports > Failed Report
Direct Link: Open
Filters
- Select From Date and To Date.
Search Tools
- Search by Txn ID, Internal ID, Order ID, Customer Email, Card Number.
- Filter by Payment Method and Currency.
Export Options
- Download as PDF or CSV.
- Column Visibility to show/hide fields.
3.3 📘 Refund Report
Tracks all refunded transactions (full or partial) for monitoring return activities.
Navigation:
Go to: Payment Reports > Refund Report
Direct Link: Open
Filters
- Select From Date and To Date.
Search Tools
- Search by Order ID or Customer Name.
Export Options
- Download PDF or CSV.
- Column Visibility controls.
3.4 📘 Settlement Report
Displays settlement details for completed transactions, useful for reconciliation.
Navigation:
Go to: Payment Reports > Settlement Report
Direct Link: Open
Filters
- Date Range: Set a custom time frame.
Search Tools
- Keyword search available.
- Column Visibility and CSV Export available.
Key Fields
- Fixed Charge
- Amount Settled
3.5 📘 POS Report
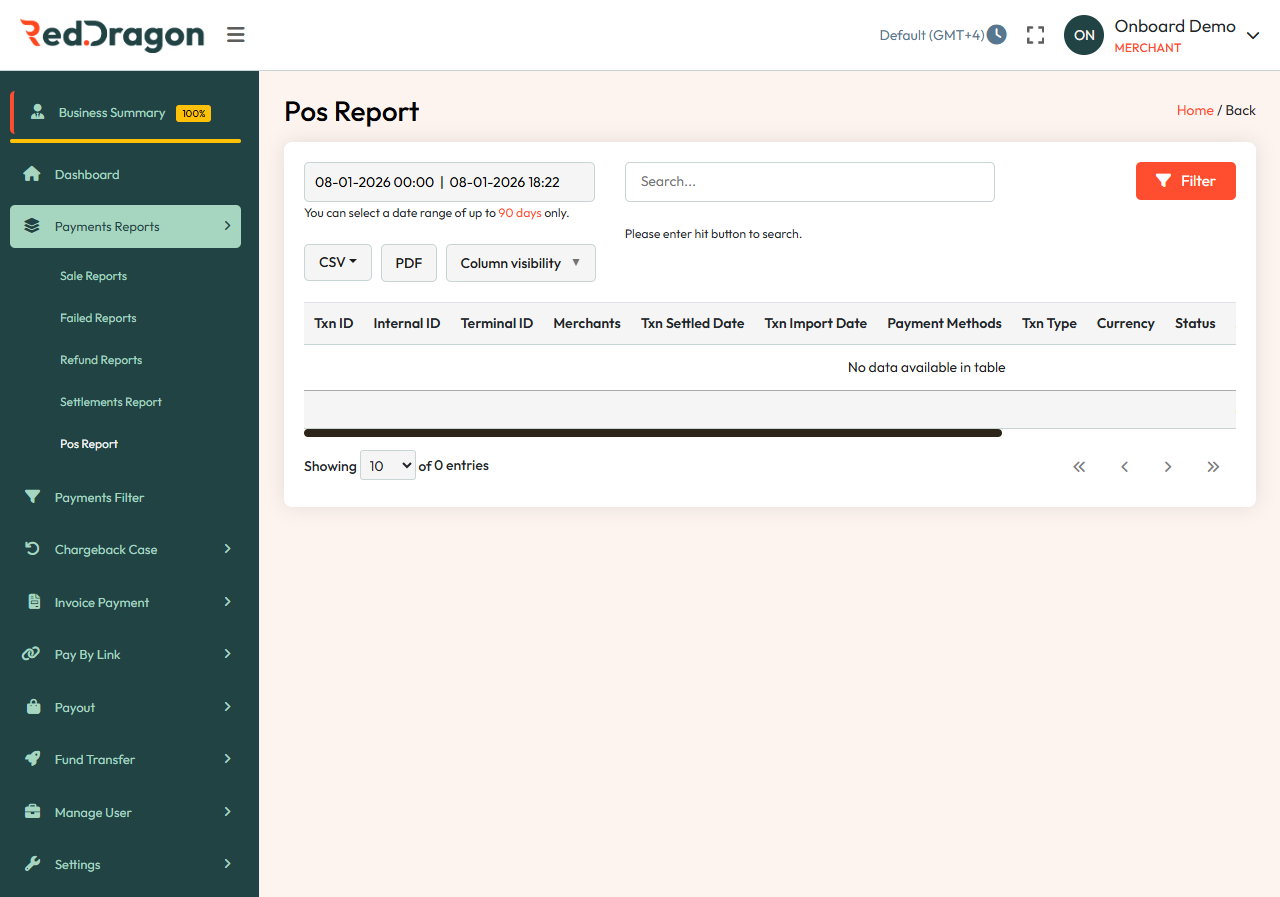
A POS Transaction Report is a summary of all transactions made through point-of-sale terminals. It allows merchants to track in-store payments, verify settlements, and reconcile daily POS activity.
Navigation:
Go to: Payment Reports > POS Report
Direct Link: Open
Filters
- Set From and To Date range.
Search Tools
- Enter keywords and hit search.
- CSV Export and Column Visibility options available.
POS Report Filter – Status Field
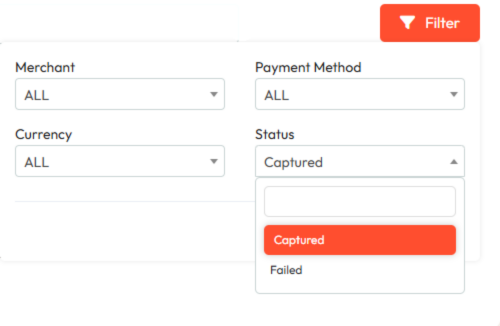
The Status filter determines which transactions are displayed based on their processing result.
Options
| Option | Meaning | When to Use |
|---|---|---|
| Captured | Transaction was successfully processed and funds were confirmed by the payment gateway. | Use this to review successful or completed payments. |
| Failed | Transaction was unsuccessful due to issues like card decline, insufficient funds, or network error. | Use this to check unsuccessful or declined transactions. |
How It Works
- By default, the Captured status is selected, showing only successful transactions.
- Selecting Failed updates the report to show declined or incomplete transactions.
- You can toggle between the two and click Filter to refresh the data.
Best Practices
- Use Captured for settlement, accounting, or reconciliation reports.
- Use Failed for troubleshooting errors and analyzing payment issues.
- Always verify the date range and merchant before applying the status filter for accurate results.
4. 🧭 Payment Filter Page
📍 Page Overview
This page allows users to search and filter transaction records within a specified date and time range. It is part of the Red Dragon Pay sandbox environment, typically used for testing and development.
🔍 Main Features
Date Range Selection
- Fields: Two date-time pickers.
- Purpose: Define the start and end time for the transaction search.
- Example: From 27-05-2025 00:00 to 27-05-2025 10:31.
- maximum range you can select calender is 3 months.
Search Button
- Action: Execute the search based on the selected date range.
CSV Dropdown
- Function: Export the search results in CSV format.
Column Visibility
- Function: Customize which columns are visible in the transaction table.
Search Bar
- Placeholder: "Please enter hit button to search."
- Function: Allows keyword-based filtering of the displayed results.
Filter Button
- Location: Right side of the control panel.
- Function: Opens additional filtering options.
📊 Transaction Table
Columns Available:
- Txn ID - Unique transaction identifier.
- Internal Id - Internal system reference.
- Order Id - Associated order number.
- Merchants - Merchant name or ID.
- Txn Date / Txn Date UTC - Local and UTC timestamps of the transaction.
- Customer Email / Name - Customer details.
- Payment Methods - Method used (e.g., card, wallet).
- Txn Type - Type of transaction (e.g., payment, refund).
- Card Num - Masked card number used in the transaction.
- Currency - The currency used in the transaction.
- Status - Current status (e.g., success, failed).
- Amount - Total amount.
Note: The table may show "No data available in table" when no transactions match the current search criteria.
Navigation Sidebar:
In the sidebar, navigate to Payments Filter (highlighted).
Direct link: Open
5. Chargeback Case
Description: Track and manage chargeback requests.
Testing Notes:
- Add new case, change status, upload proof.
- Verify merchant cannot access another's case.
Accessing the Chargeback Section
- Log in to your Red Dragon Pay dashboard.
- From the left sidebar, navigate to Chargeback Case.
- Click on View Chargeback to see the list of chargeback cases.
- Link: Open
🔹 Chargeback Case Fields - Description List
- Case ID - Unique identifier for the chargeback case.
- OID - Order Identifier linked to the transaction.
- Order ID - Original order number.
- Type - Type of dispute (e.g., Charge Back).
- Status - Current status (e.g., New, In Progress, Resolved).
- Card Number - Masked card number used in the transaction.
- Amount - Disputed transaction amount.
- Target Date - Deadline for responding to the chargeback.
- Target ID - Identifier for the target entity (e.g., merchant or system).
Filtering and Searching
- Use the search bar or filters to locate specific cases by Case ID, Order ID, Status, or Date.
Managing a Chargeback Case
- Select a case, review details, and respond.
- Upload supporting documents (e.g., proof of delivery, customer communication).
- Add comments or notes if required.
- Update status (e.g., from "New" to "In Progress").
- Submit response.
Important Tips
- Monitor Target Dates to avoid automatic resolution in favor of the cardholder.
- Keep records for all transactions and communications.
- Use Analytics to track trends in chargebacks.
6. Invoice Payment Module
This module allows users to create and manage payment links for customers. It includes two main features:
6.1 Invoice Configuration User Guide
Navigation: Sidebar > Link Payment > Invoice Configuration
Purpose: Upload a business logo and add a custom message that will appear in the invoice and payment link page.
Section 1: Upload Logo
Instructions:
- Click Choose file and select an image.
Requirements:
- File size < 200 KB
- Accepted formats: JPG or PNG
If the file doesn't meet requirements, the upload will be rejected.
Section 2: Invoice Message / Note
Instructions:
- Enter a brief message or note (≤ 120 characters).
Shown At:
- During invoice creation
- On the payment link page
Save Configuration
Click Save Details to store your configuration.
Tips
- Use a clear, high-quality logo under 200 KB.
- Write a concise, helpful message.
Create Invoice Module
Purpose
Help merchants use Red Dragon Pay Invoice product to collect payments via SMS and email.
User Guide: Create Invoice
1. Access the Create Invoice Page
- Log in to the merchant portal.
- Left menu: Invoice Payment > Create Invoice
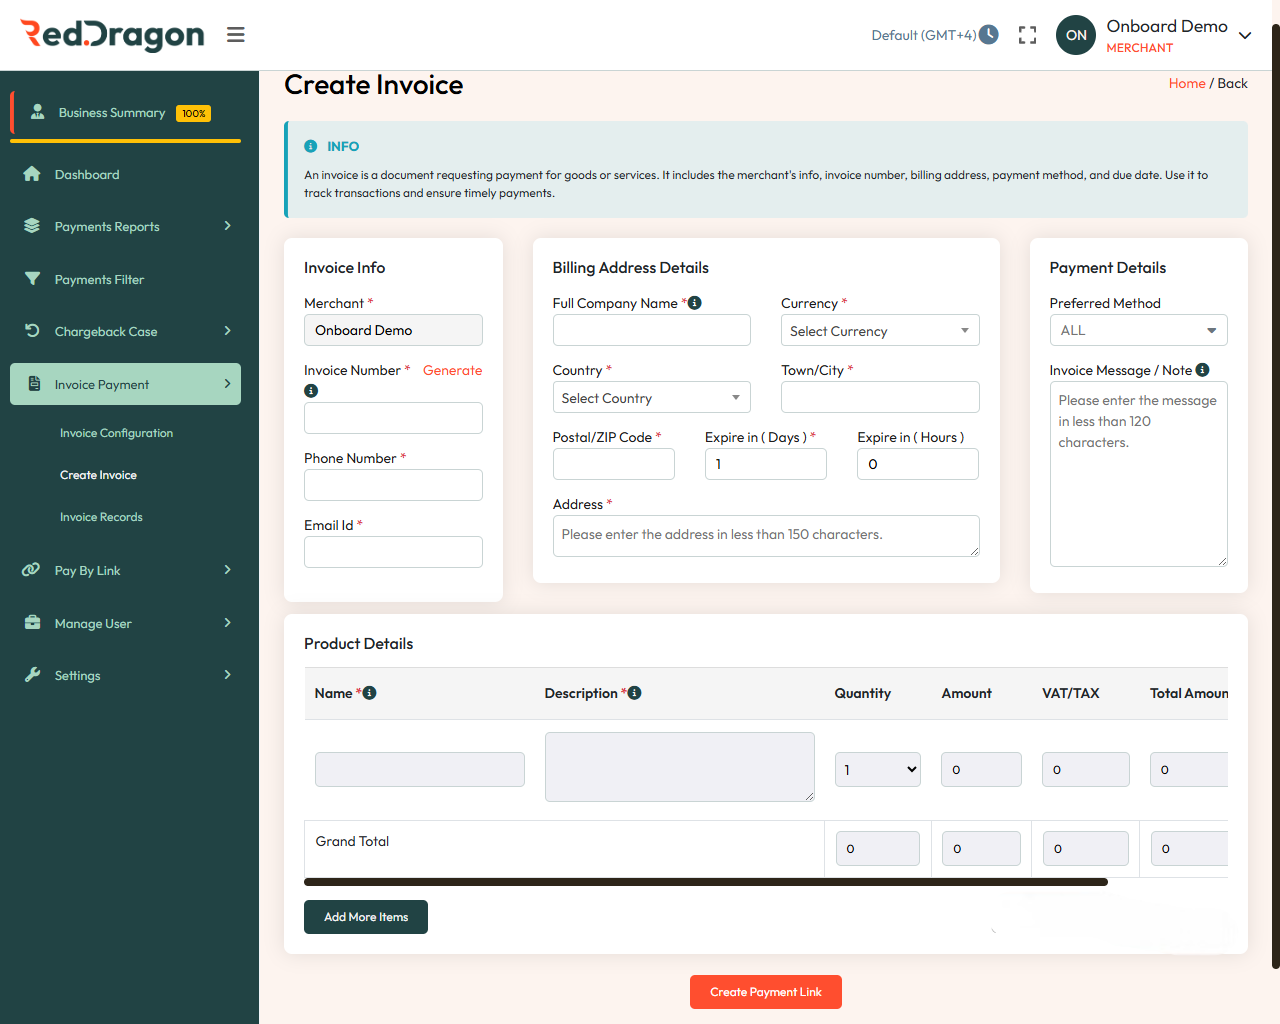
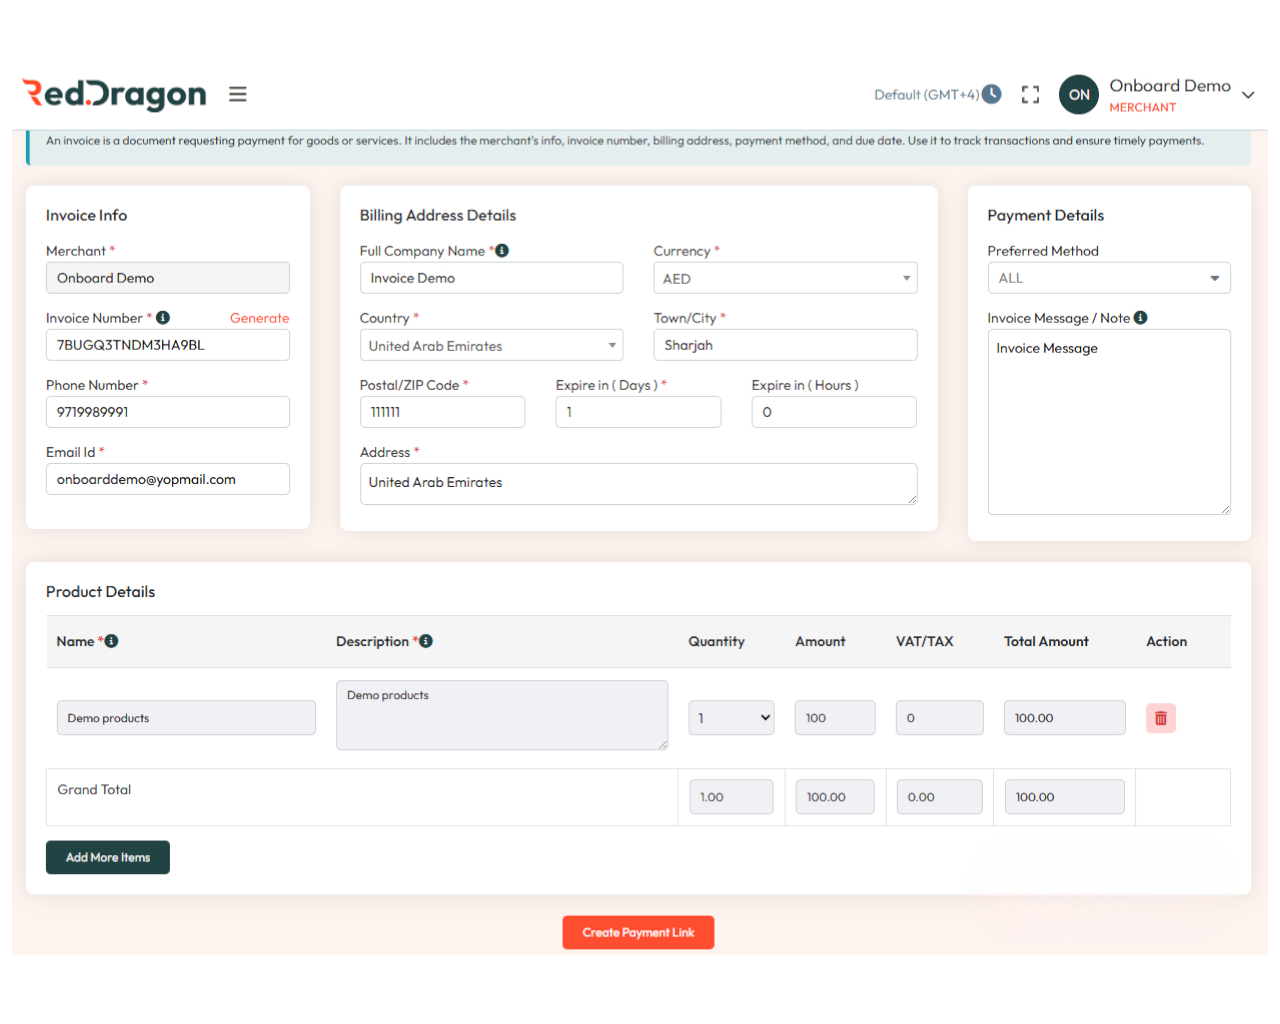
2. Fill Invoice Info
- Merchant: Pre-filled with your merchant name (e.g., Onboard Demo).
- Invoice Number: Click Generate or enter a custom number.
- Phone Number: Customer's phone.
- Email ID: Customer's email.
3. Enter Billing Address Details
- Full Company Name: Customer name.
- Currency: Select from dropdown.
- Country / Town/City / Postal/ZIP / Address: Enter details (Address ≤ 150 characters).
- Expire in (Days/Hours): Define link expiry (mandatory).
4. Add Payment Details
- Preferred Method: Select (ALL, Card, etc.).
- Invoice Message / Note: Optional (≤ 120 characters).
5. Enter Product Details
- Name / Description / Quantity / Amount / VAT/TAX
- Total Amount and Grand Total auto-calculated.
- Click Add More Items to add multiple products.
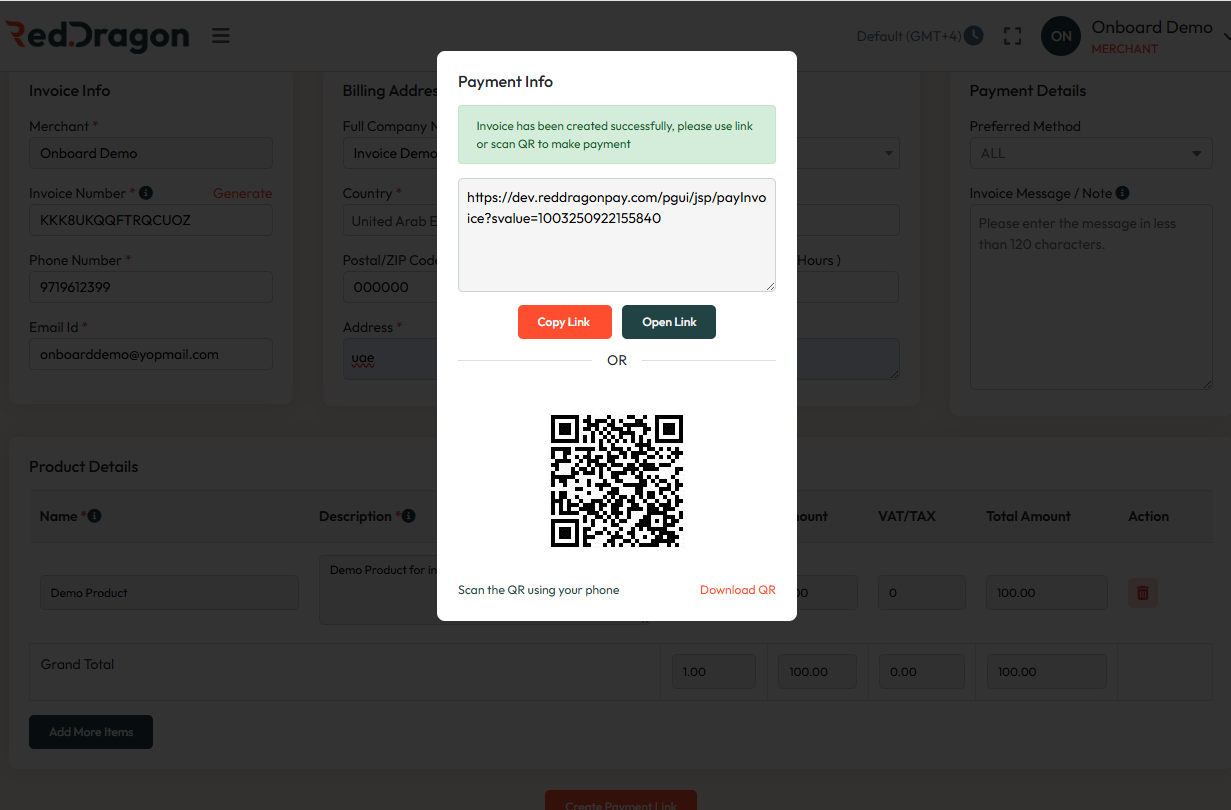
6. Generate the Payment Link
- Review fields.
- Click Create Payment Link.
- Share via email, SMS, or copy.
7. Best Practices
- Double-check email/phone.
- Set realistic expiry times (e.g., 24–48 hours).
- Use invoice notes for clear instructions.
8. Payment Link Options After clicking Create Payment Link, a popup provides options:
- Copy Link - Copy the payment URL.
- Open Link - Open the payment page in the browser.
- QR Code - Scan to open on phone.
- Download QR - Save and share the QR code.
9. Customer Receives Payment Link Customers can receive the payment link via shared link, QR scan, or automated email.
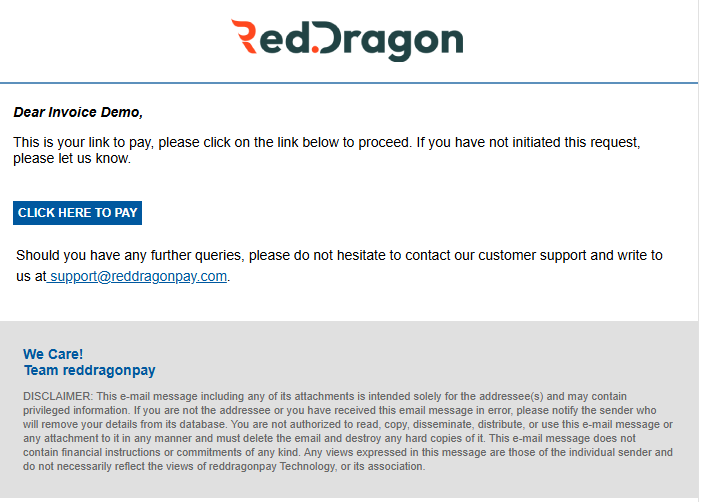
Email contains:
- Invoice details
- Click Here to Pay button
- RedDragonPay support contact
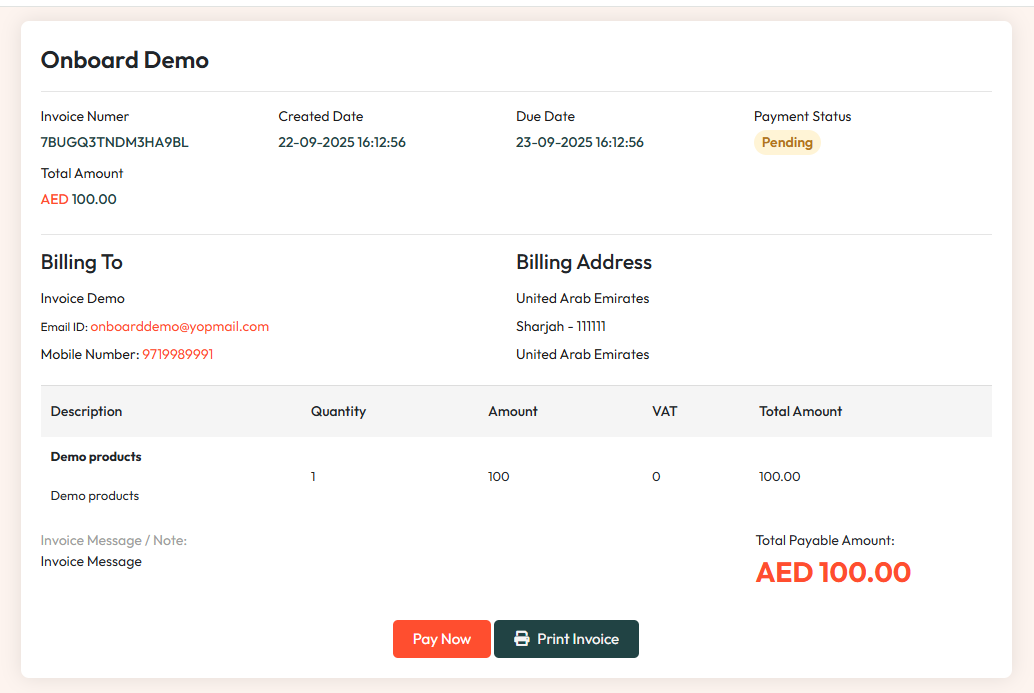
10. Invoice Page When the customer opens the link:
- Shows Invoice Number, Created Date, Due Date, Status (Pending)
- Billing Information and Product Details
- Actions: Pay Now, Print Invoice
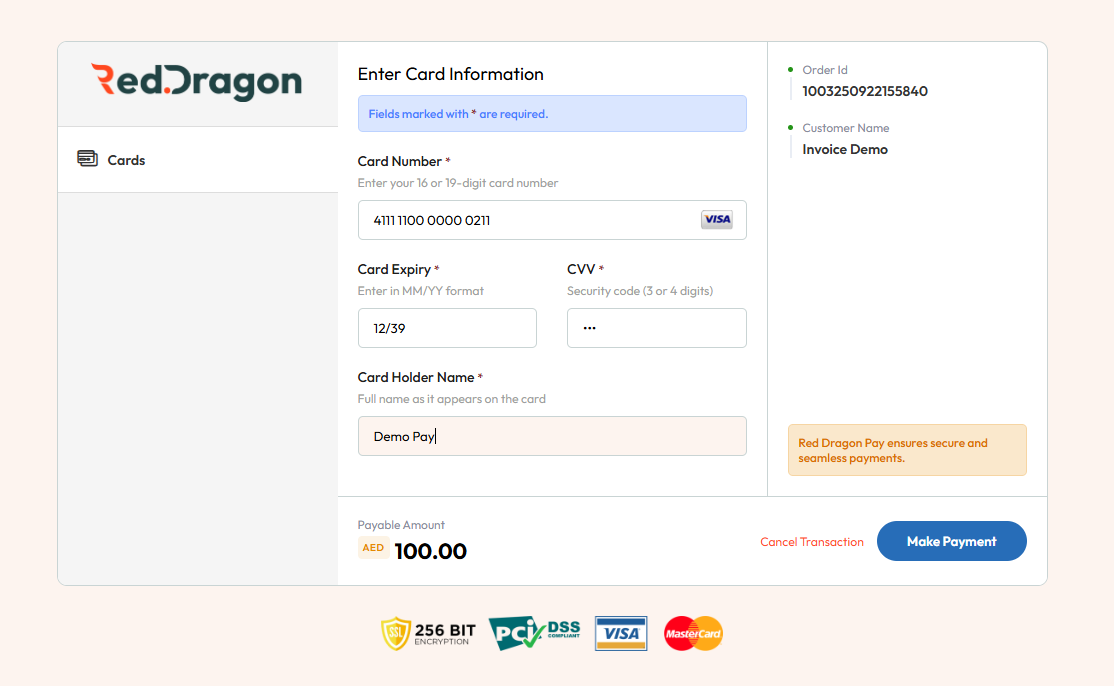
11. Secure Payment Page When the customer clicks Pay Now:
- Card Number / Expiry (MM/YY) / CVV / Card Holder Name
- Order ID and Customer Name
- Payable Amount
- Click Make Payment
Security
- PCI DSS compliant
- 256-bit encryption
- Supports Visa and MasterCard
12. Transaction Completion
- Customer sees a confirmation message on success.
- Status changes Pending > Success.
- Merchant can view it in Payments Report.
Flow Summary
- Merchant creates link > shares via copy/email/QR.
- Customer opens link > lands on invoice page.
- Customer clicks Pay Now > enters card details.
- Secure transaction > confirmation generated.
6.2 Invoice Records
Use this screen to search and manage existing payment links.
Direct link: Open
Search Filters:
- Date Range
- Search Button
- CSV Export
- Column Visibility
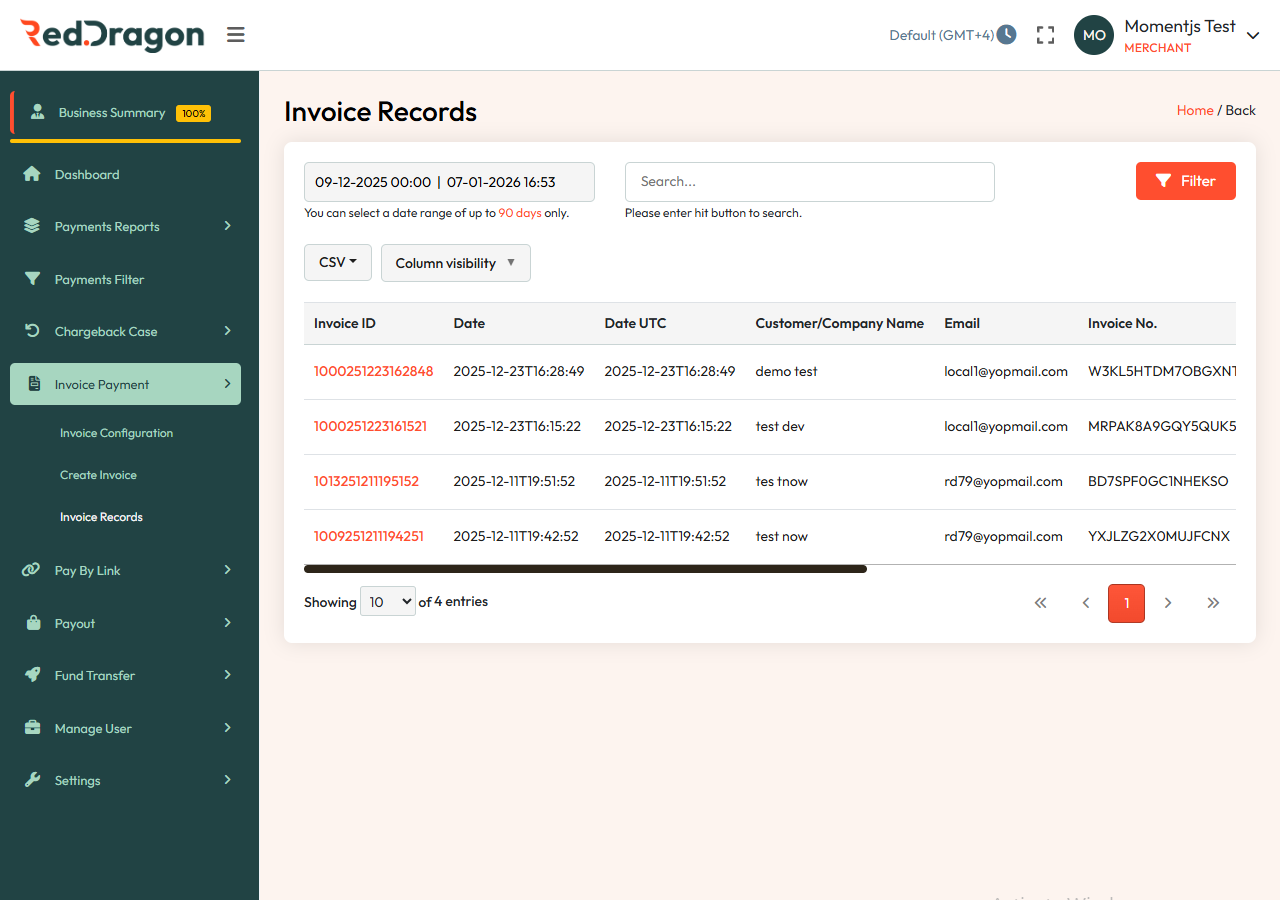
Search Results Table Columns:
- Invoice ID - Unique identifier.
- Date - Local creation timestamp.
- Date UTC - UTC timestamp.
- Customer/Company Name - Recipient.
- Email - Recipient email.
- Invoice No. - Custom or system-generated invoice number.
- Currency - e.g., USD, EUR, INR.
- Amount - Total payable.
- Type - One-time or recurring.
- Payment Status - Pending, Paid, Failed, Expired.
- Link Validity - Active, Expired, or Used.
- Action - View, Edit, Resend, Delete.
Note: "No data available in table" indicates no matching records for the selected filters.
7. User Guide: Pay By Link Module
The Pay By Link module in the Red Dragon Pay portal allows merchants to generate secure, shareable payment requests. This feature is ideal for collecting payments via email, chat apps, or in-person using QR codes.
Accessing the Module
- Log in to your Red Dragon Pay merchant dashboard.
- From the sidebar menu, click on Pay By Link.
- Select Create Pay By Link to open the generation form.
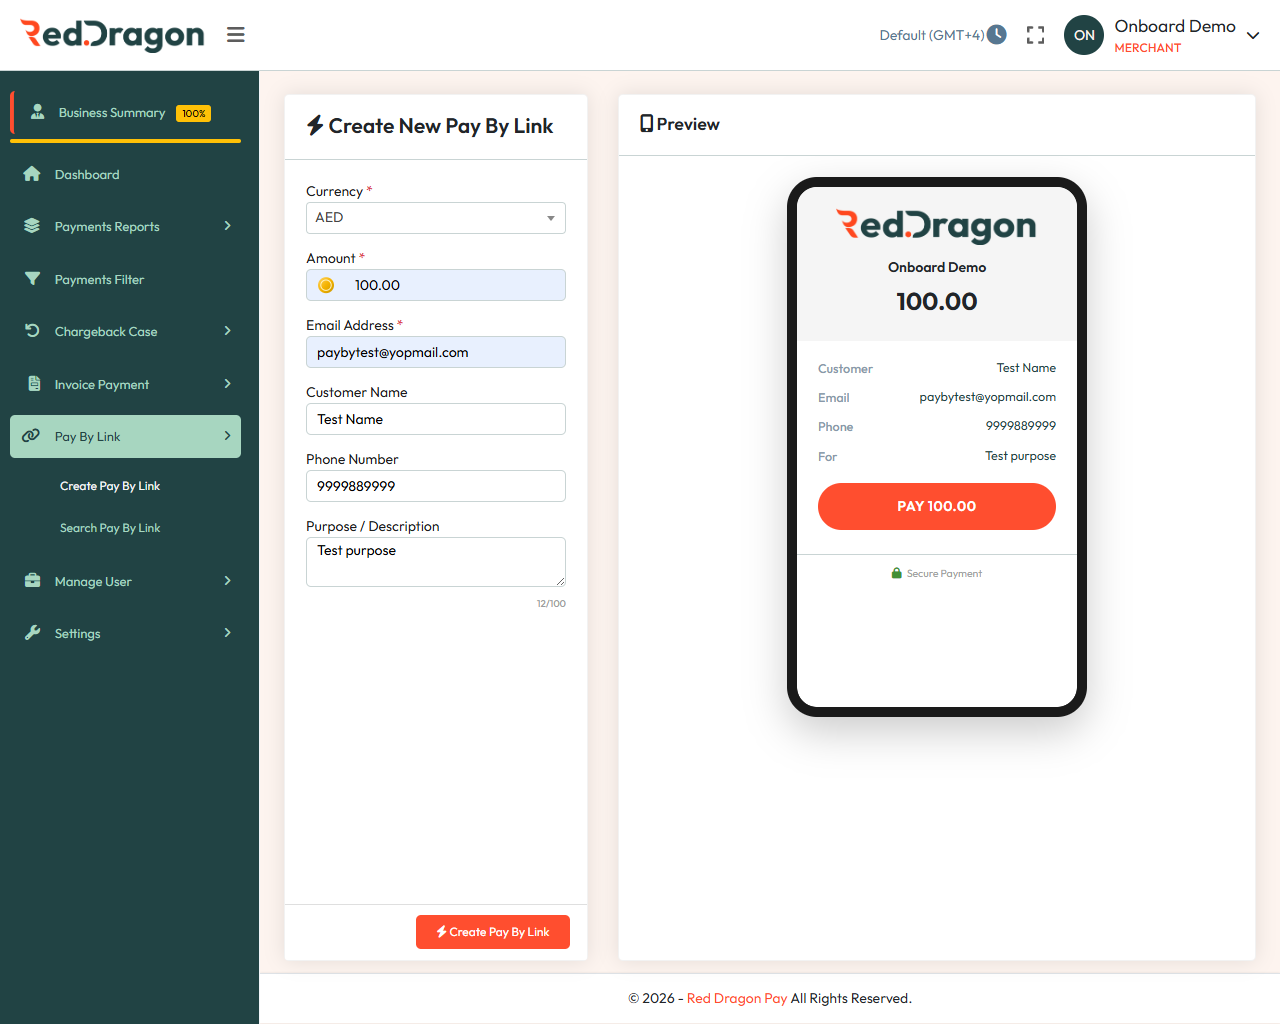
7.1 Create Pay By Link
Fill in the Create New Pay By Link form with the following details:
- Currency: Select the currency for the transaction (e.g., AED).
- Amount: Enter the total value to be charged.
- Email Address: Enter the customer's email (required for automated notifications).
- Customer Name: Enter the name of the payer.
- Phone Number: Enter the customer's contact number.
- Purpose / Description: Provide a brief note regarding the payment (e.g., "Test purpose").
Note: Use the Preview pane on the right to see exactly how the payment request will look on a customer's mobile device before you send it.
Click the Create Pay By Link button at the bottom of the form to proceed.
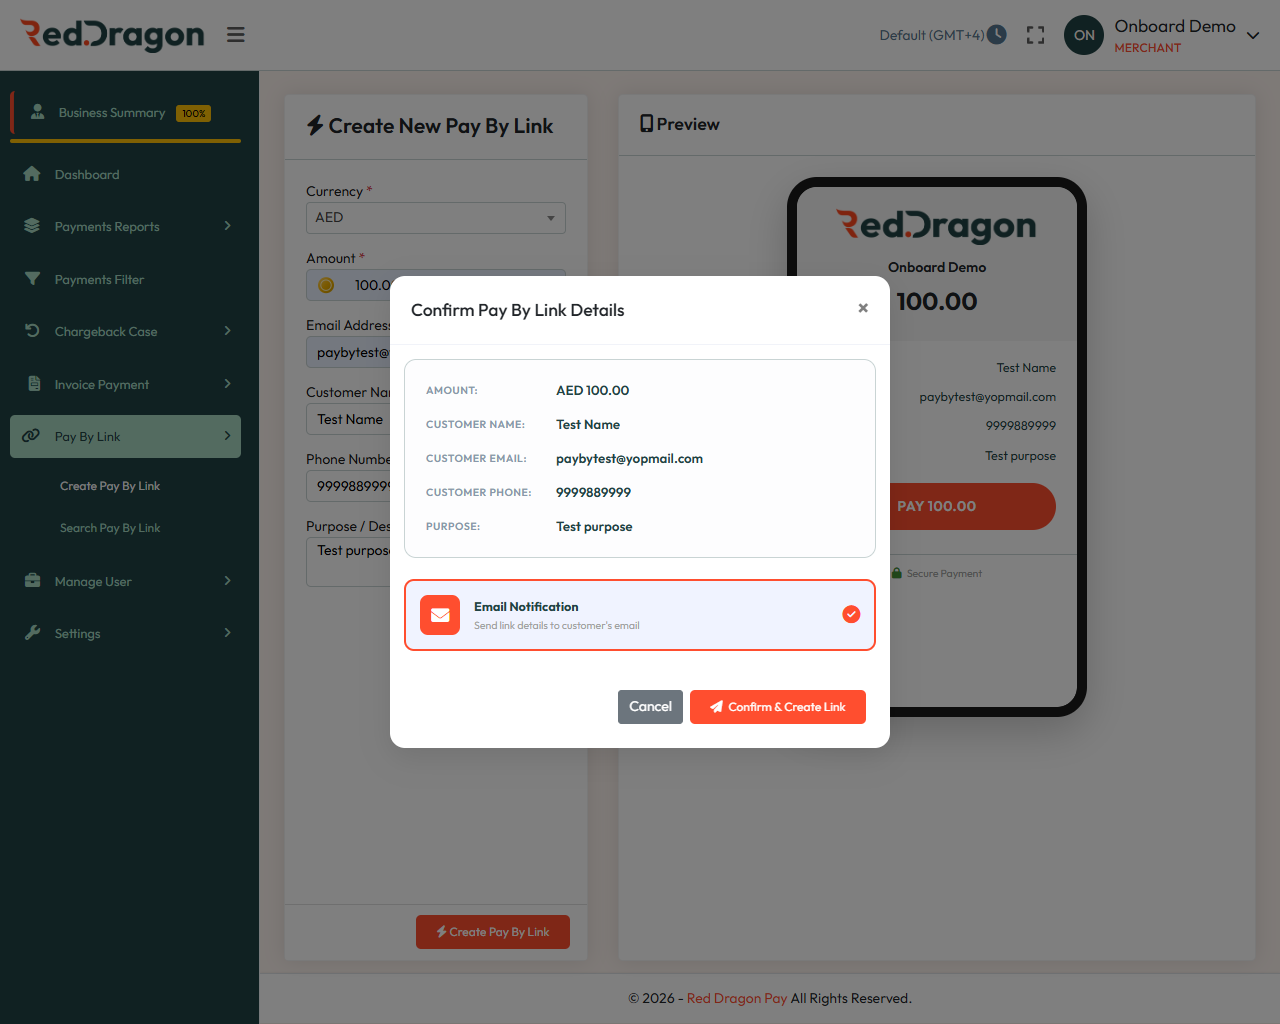
Review and Confirmation
A summary pop-up will appear titled Confirm Pay By Link Details.
- Verify Data: Double-check the Amount, Name, and Email.
- Notification Toggle: Ensure the Email Notification option is checked if you want the system to send the link automatically.
- Finalize: Click Confirm & Create Link.
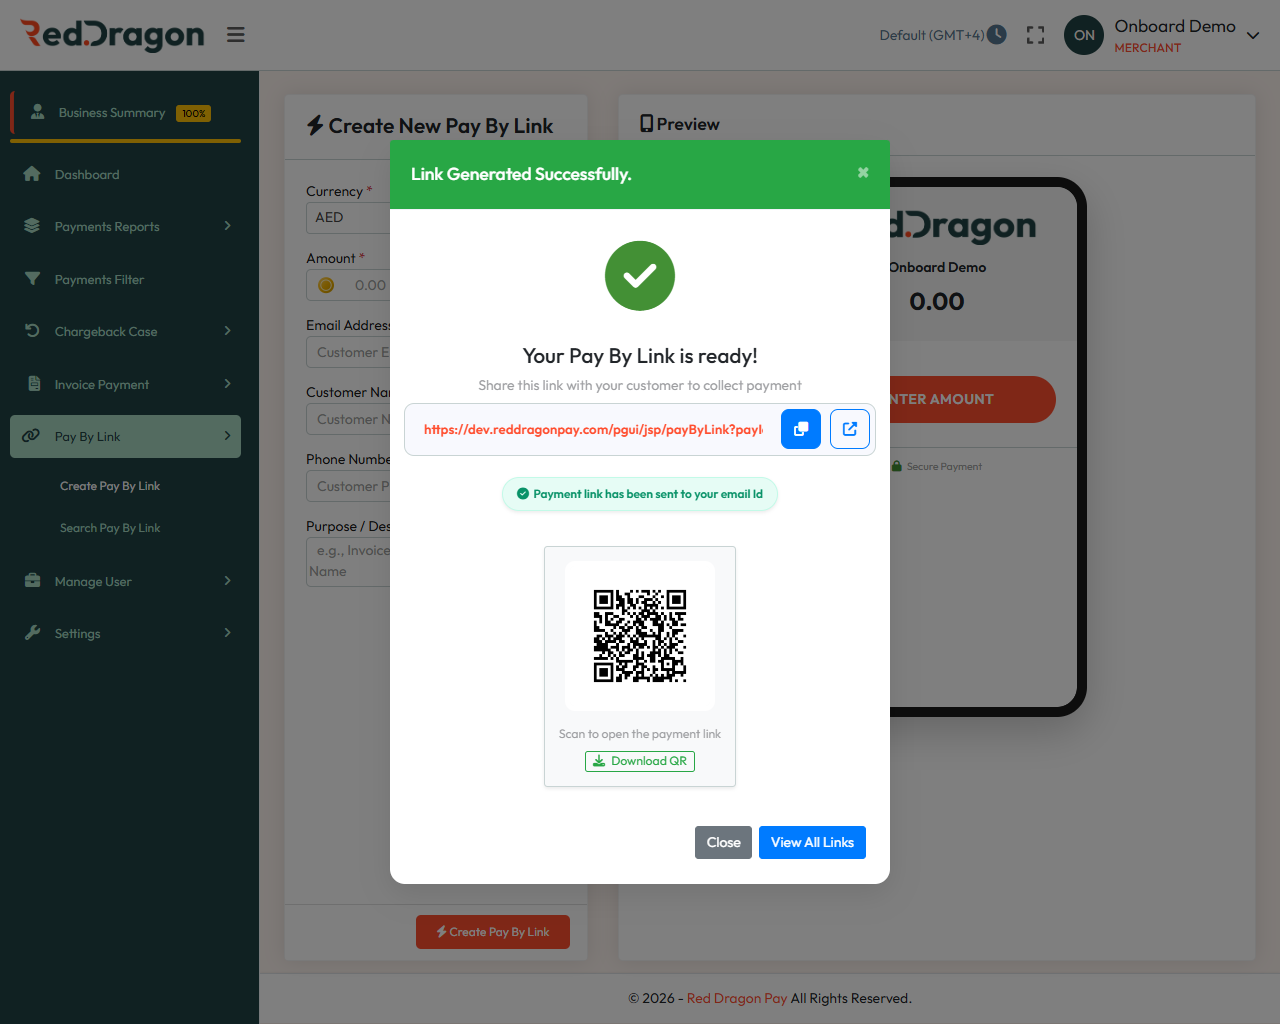
Sharing the Link
Once the link is generated, a "Link Generated Successfully" window will appear providing three ways to collect payment:
- URL Sharing: Copy the generated URL to your clipboard or click the 'Open' icon to view it.
- QR Code: Customers can scan the on-screen QR code for immediate payment.
- Download: Click Download QR to save the code for use in physical invoices or storefronts.
- Email Notification: Customers will get link in their respective emails from their they can pay the amount.
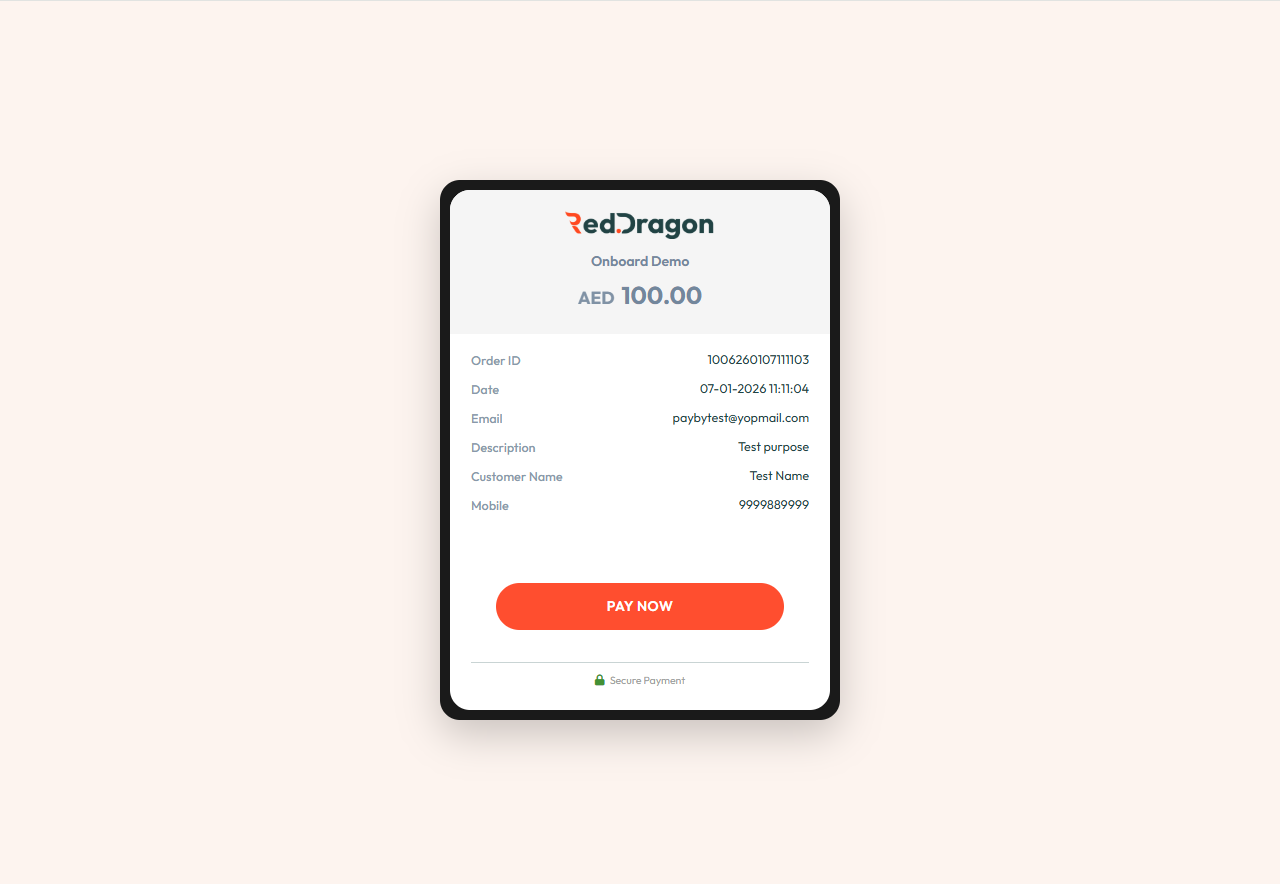
Customer Experience (Payment Landing Page)
When the customer clicks the link, they are taken to a secure hosted page that displays:
- Transaction Summary: Order ID, Date, Description, and Customer Name.
- Amount Due: Clearly displayed in the selected currency.
- Call to Action: The customer clicks PAY NOW to enter their payment credentials securely.
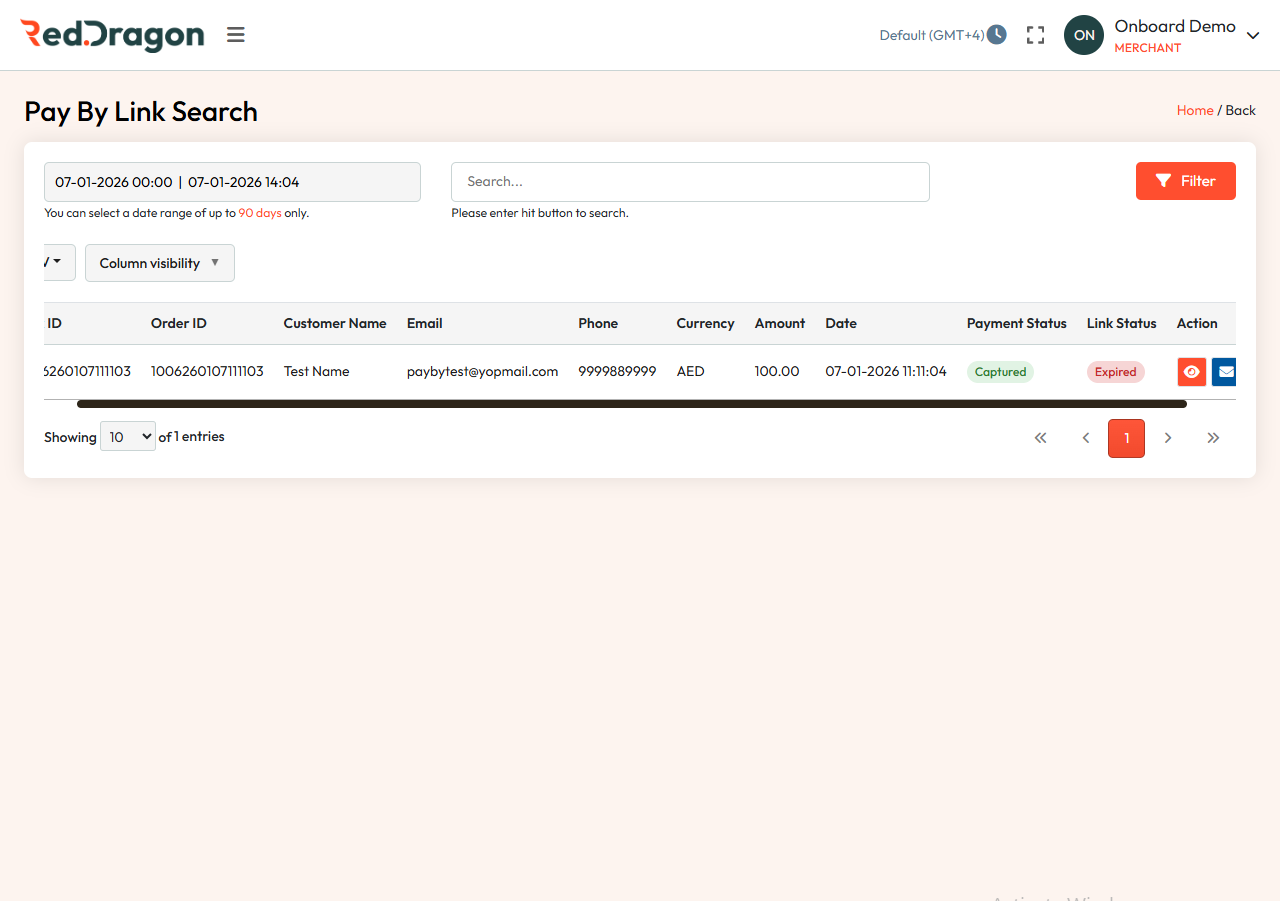
7.2 Search Pay By Link
The Search Pay By Link module in the Red Dragon Pay portal allows merchants to track, monitor, and manage all payment links generated through the platform. This guide covers how to filter results, check payment statuses, and perform actions on existing links.
Accessing the Search Module
- Log in to your Red Dragon Pay merchant dashboard.
- Navigate to the sidebar menu and click on Pay By Link.
- Select Search Pay By Link from the submenu.
Filtering and Finding Links
The search interface provides several tools to help you locate specific transactions:
- Date Range Picker: Select a specific start and end date to view links generated within that window.
- Note: You can select a date range of up to 90 days only.
- Search Bar: Enter specific keywords (such as Order ID, Customer Name, or Email) and press the search icon or enter key to find a match.
- Filter Button: Click the orange Filter button to apply your selected date and search criteria to the table.
- Column Visibility: Use this dropdown to customize which data columns (e.g., Phone, Currency, Date) are visible in your current view.
Understanding the Results Table
The results table displays the following key information for each link:
| Column | Description |
|---|---|
| ID / Order ID | Unique system identifiers for the specific payment request. |
| Customer Info | Name, Email, and Phone number provided during link creation. |
| Amount | The total value and currency (e.g., AED 100.00). |
| Date | The exact timestamp when the link was generated. |
| Payment Status | Indicates if the payment is Captured (successful) or Pending. |
| Link Status | Shows if the link is still Active or has Expired. |
Available Actions
At the end of each row under the Action column, you can interact with the record:
- View Details (Eye Icon): Click this to view the full transaction summary and customer receipt details.
- Resend/Manage (Mail Icon): Use this to resend the payment notification to the customer if they haven't received it.
- QR Download (QR Icon): Use this to download the QR code so that you can send it to the other to get paid.
Exporting and Pagination
- Entries Per Page: Use the "Showing" dropdown at the bottom left to change how many records are displayed at once (e.g., 10, 25, 50).
- Navigation: Use the pagination arrows at the bottom right to move between multiple pages of results.
8. 🧾 Payout Section
This guide covers key features of the Payout module, including dashboards, initiating payouts, and viewing reports.
8.1 Initiate Payout (Raise Payout) Screen
Start a new payout by entering recipient and transaction details.
Direct link: Open
Merchant Balance Section
- Merchant / Currency / Total Balance / Check Balance

Raise Payout Form
- Merchant / Acquirer - Identifies who is requesting the payout and which institution
- Order ID (auto or manual) - Unique reference number for tracking the payout.
- First Name / Last Name - Legal name of the payout beneficiary.
- Email ID / Mobile Number - Beneficiary’s contact details for confirmation or failure alerts.
- Country / Address - Beneficiary’s location for compliance and routing.
- SWIFT Code / IBAN - Bank identifiers to route funds to the correct account.
- Amount - Exact value of payout with currency.
- Description (optional) - Purpose or note for the payout.
Action: Submit to send the payout request.
8.2 Payout Sale Report Screen
Detailed report of payout transactions.
Direct link: Open
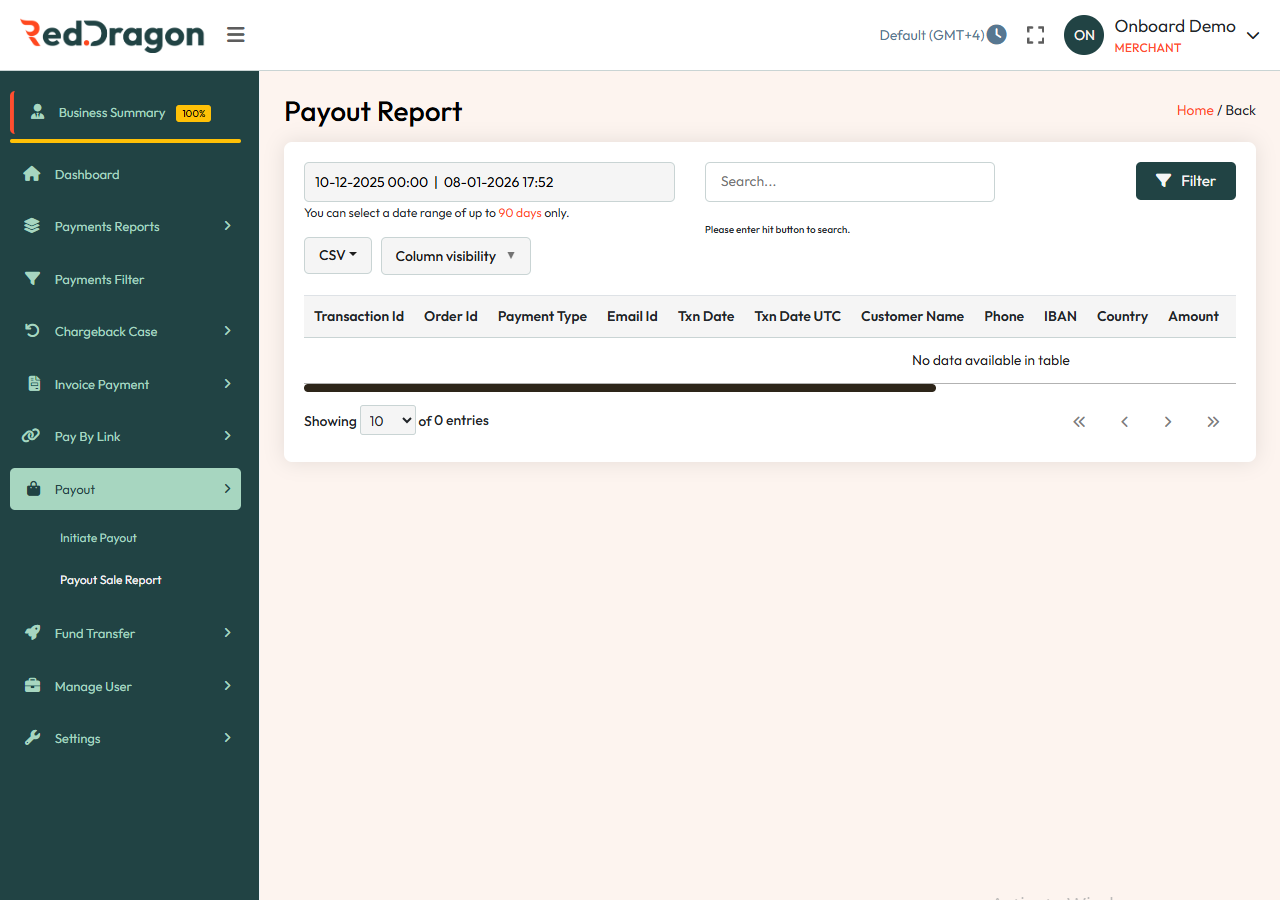
Search & Filter Options
- Date Range Selector
- Search Bar
- Filter Button
Report Table Columns
- Transaction Id
- Order Id
- Payment Type
- Email Id
- Txn Date / Txn Date UTC
- Customer Name
- Phone
- IBAN
- Country
- Amount
- Merchant TID
Note: Table may show "No data available" if no records match the filters.
9. 🧾 Fund Transfer Section
This module covers initiating transfers and viewing reports.
Direct link: Open
9.1 Initiate Transfer Screen
Merchant Balance Section
- Merchant / Currency / Total Balance / Check Balance
Transfer Details Form
Required Fields (*):
- Merchant*
- Acquirer*
- Currency*
- First Name*
- Last Name*
- Identity Type*
- Country*
- Description*
- Amount*
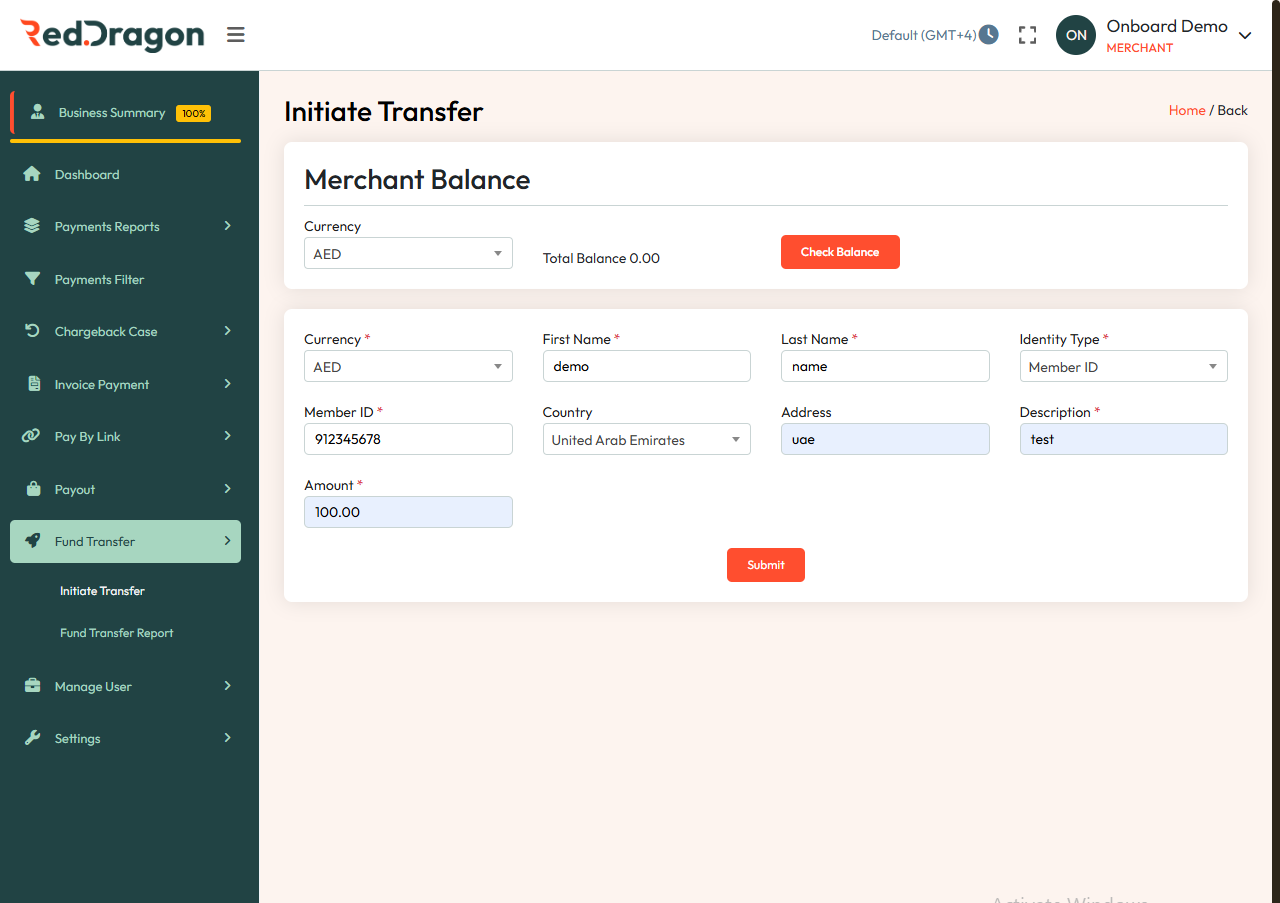
Optional:
- Address
Action: Submit to initiate the fund transfer.
9.2 Fund Transfer Report Screen
Direct link: Open
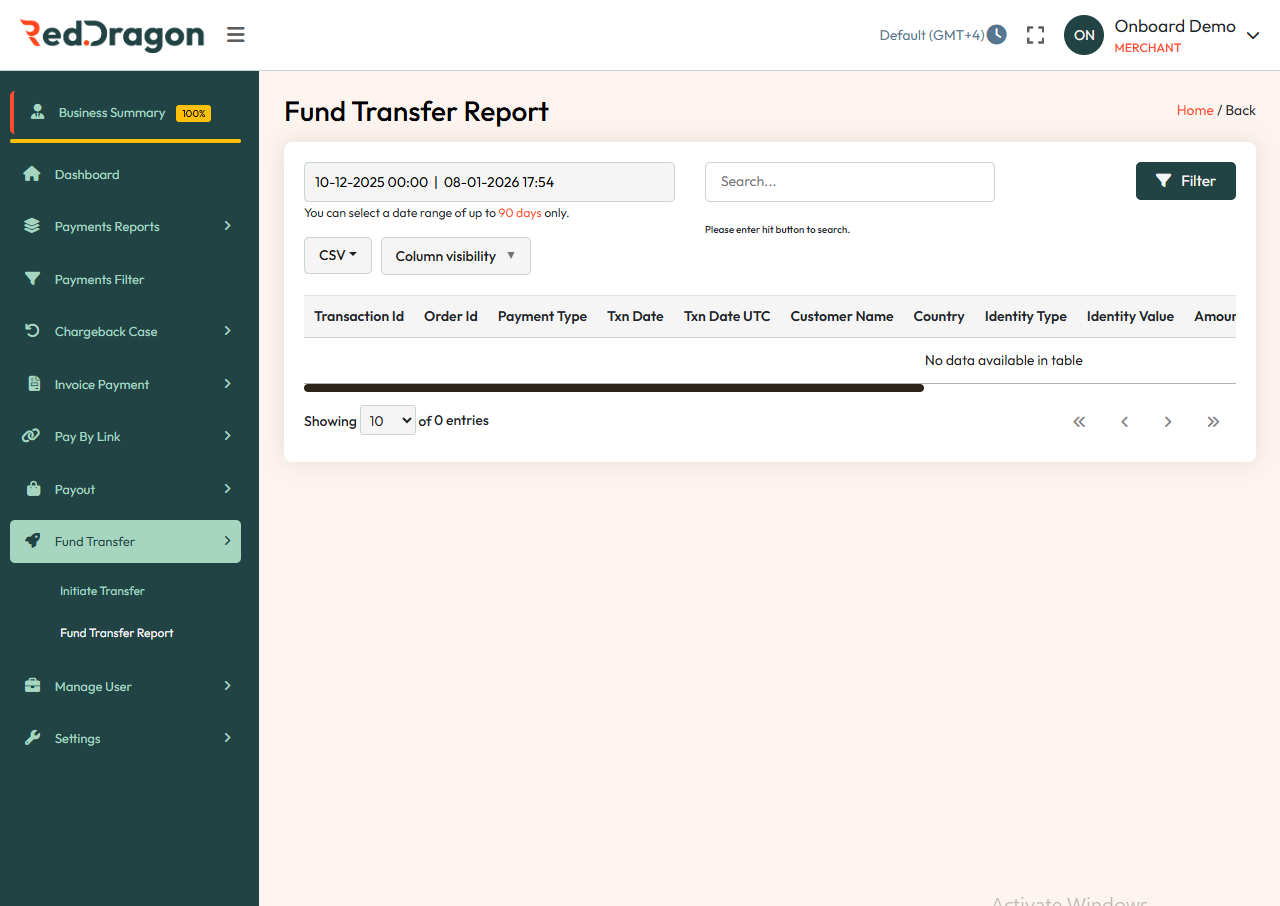
Search & Filter Options
- Date Range Selector
- Search Bar
- Filter Button
Report Table Columns
- Merchant / Acquirer - Identifies who is requesting the payout and which institution processes it.
- Order ID - Unique reference number for tracking the payout.
- First Name / Last Name - Legal name of the payout beneficiary.
- Email ID / Mobile Number - Beneficiary’s contact details for confirmation or failure alerts.
- Country / Address - Beneficiary’s location for compliance and routing.
- SWIFT Code / IBAN - Bank identifiers to route funds to the correct account.
- Amount - Exact value of payout with currency.
- Description (optional) - Purpose or note for the payout.
Note: "No data available in table" indicates no transactions for the selected range.
10. Manage User
Description: Admin controls for platform user access.
Direct link (Add User): Open
Testing Notes:
- Role-based access control testing.
- Verify email verification and reset flow.
10.1 Add User
Purpose: Create and manage Sub-user with limited permissions, ensuring secure and role-specific control.
This document outlines the standard operating procedure for adding new Sub-user to the RedDragon merchant portal. Follow these steps to grant team members access to the system.
1. Access the User Management Section
-
Log in to the RedDragon merchant portal.
-
Navigate to the sidebar menu on the left.
-
Locate and click on the Manage User tab.
-
Select Add User from the dropdown menu to open the registration form.
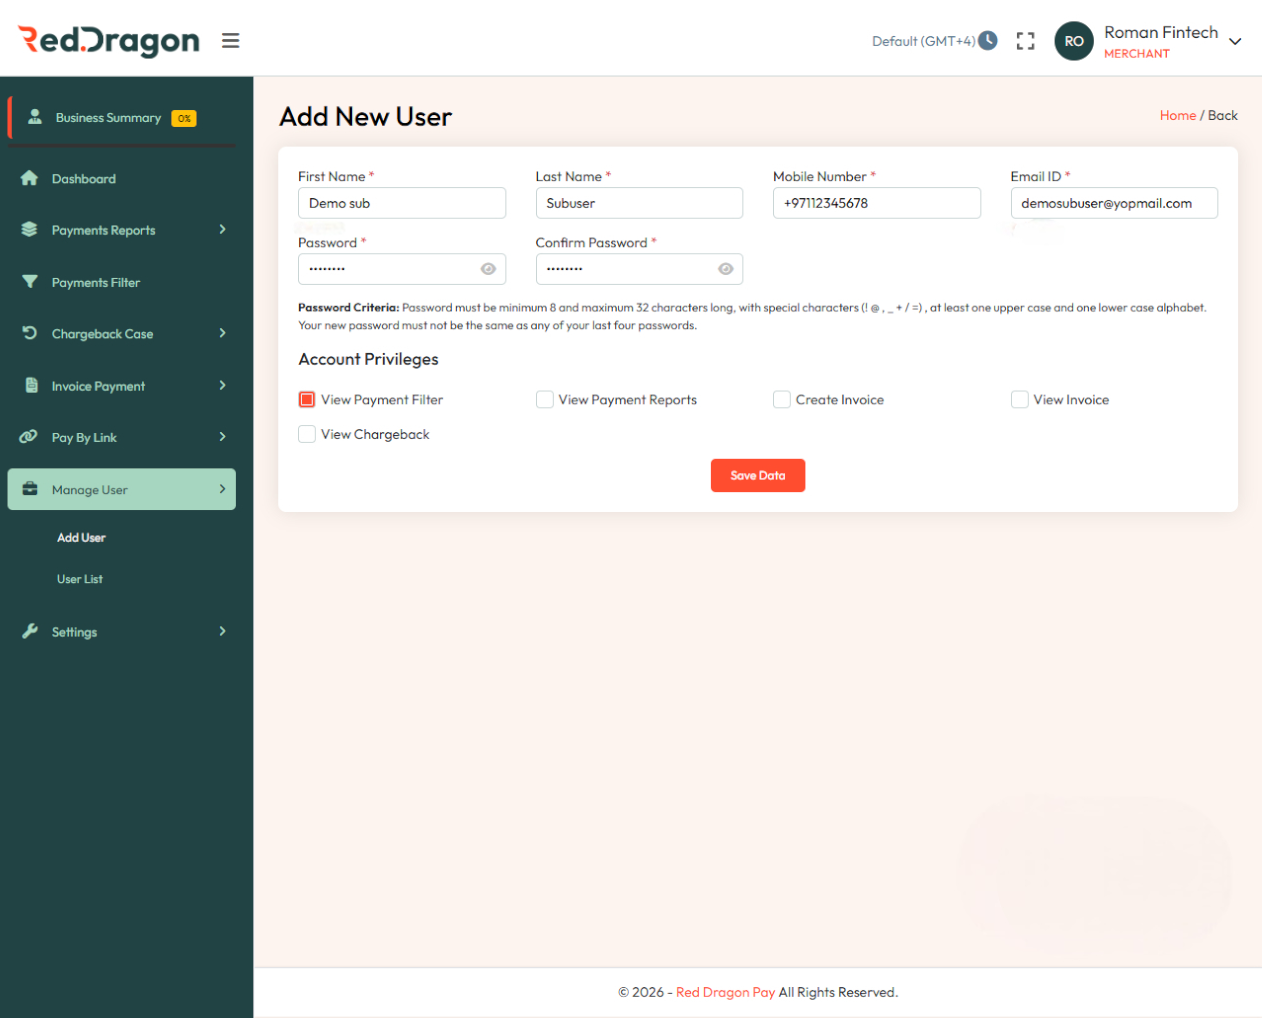
2. Enter Personal Information
Complete the mandatory fields marked with a red asterisk (*). You can use the examples below as a reference format:
-
First Name: Enter the user's first name (e.g., demo).
-
Last Name: Enter the user's last name (e.g., Sub-user).
-
Mobile Number: Enter the contact number including the country code (e.g., +97191919999).
-
Email ID: Enter the user's valid corporate email address (e.g., demosubuser@rdpay.com).
3. Set Account Security
Password Criteria:
-
Length: Minimum 8 and maximum 32 characters.
-
Complexity: Must include special characters (! @ , _ + / =).
-
Case: Must contain at least one upper case and one lower case letter.
-
History: Cannot be the same as any of the last four passwords.
-
Sub-user will get email for password change, if needed they can change them.
4. Account Privileges
Set the access levels for the new Sub-user.
Default Privilege
[x] View Payment Filter: This box should be checked by default for all new Sub-user to allow basic filtering of payment data.
Optional Privileges
Select the "rest of them" only if the user's specific role requires it:
-
View Payment Reports: Grant this to users who need to analyze financial data.
-
Create Invoice: Grant this to sales or billing staff who generate payment links.
-
View Invoice: Grant this to support staff who need to verify existing invoices.
-
View Chargeback: Grant this to risk management teams handling disputes.
5. Finalize Account Creation
-
Review all entered information for accuracy.
-
Click the red Save Data button at the bottom of the form.
-
The new user will be created and added to the User List.
10.2 User List / Sub-Admin List
Purpose: View, manage, and update sub-admin users, their status, and contact details.
Direct link (Search User): Open
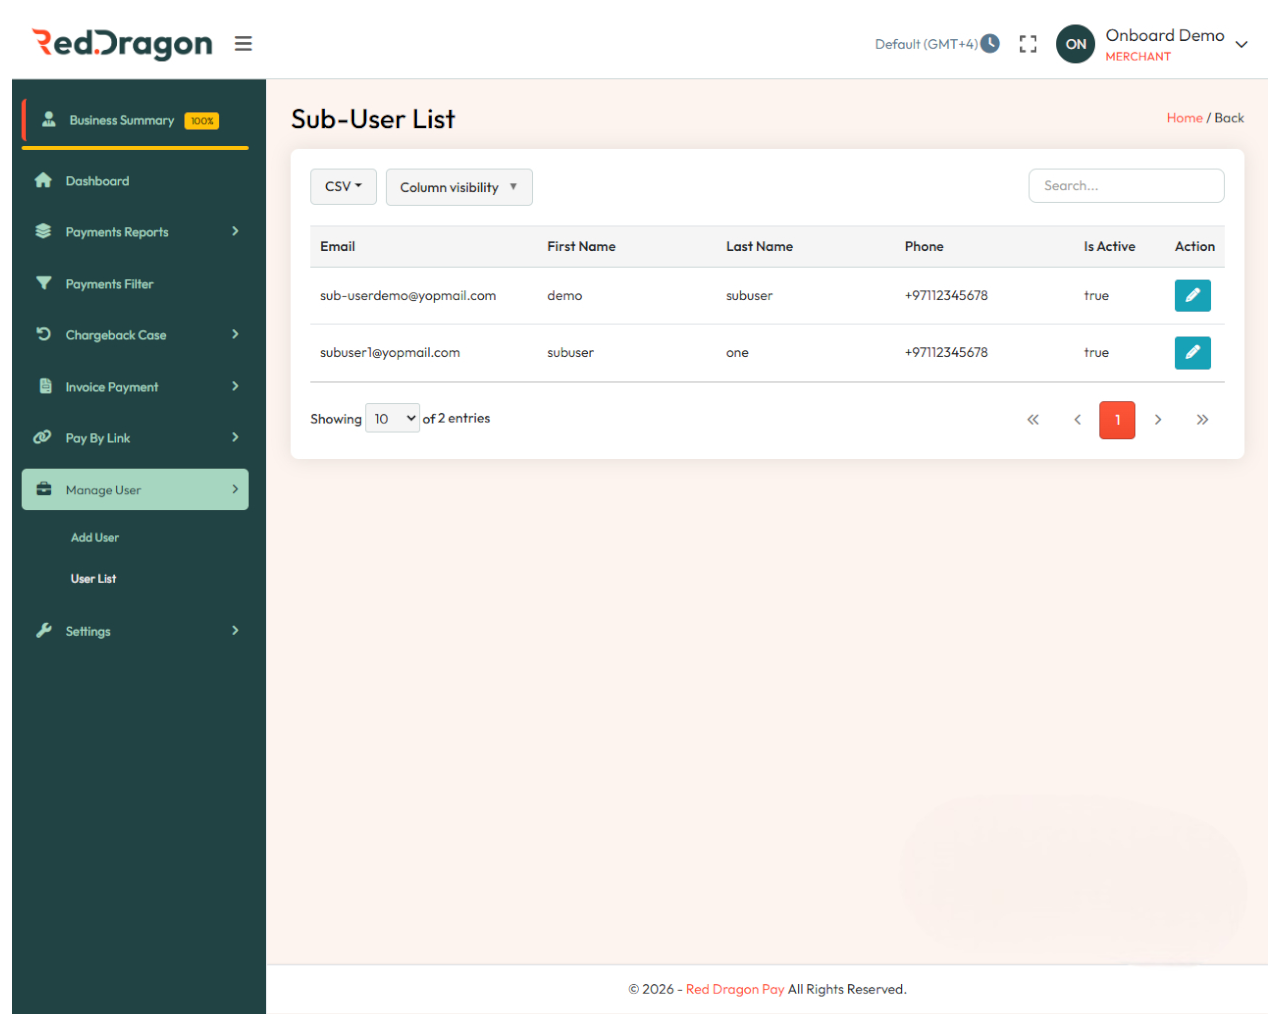
Columns:
- Email : Email of the Sub-user.
- First Name / Last Name : First name and last name of the Sub-user.
- Phone : Phone number of the Sub-user.
- Is Active (true/false) : Shows the status of the Sub-user whether it is active or not.
- Action : edit icon to modify details/permissions.
Examples:
- Deactivate a sub-admin who left the organization.
- Update contact details or correct user information.
- Review active users for security audits.
11. 🛠️ Settings
Manage user settings in the Red Dragon Pay dashboard, including updating profile information, changing your password, and accessing integration docs.
11.1 👤 My Profile
Access: Sidebar > Settings > My Profile
Direct link: Open
User Details
- Business Name
- App ID
- Secret Key (hidden; click to view securely)
- Email ID
Contact Details
- Notification/Webhook URL (submit to save)
11.2 Integration Docs
Access: Settings > Integration Docs
Navigates to the API documentation: docs.reddragonpay.com
11.3 🔐 Change Password
Access: Settings > Change Password
Direct link: Open
Steps
- Enter your old password.
- Enter and confirm your new password.
- Click Save.
Password Criteria
- Length: 8–32 characters.
- Must include:
- At least one uppercase letter
- At least one lowercase letter
- At least one special character (! @ # , . + / =)
- Must not be the same as any of your last four passwords.