Merchant Onboarding Process
This guide provides a step-by-step walkthrough for filling out each section of the My Business Summary, which is a crucial part of the KYC (Know Your Customer) process on our platform.
Below is a flow chart designed for merchants to easily understand the onboarding and KYC documentation process
NOTE - The merchant may revise the Business Summary details as necessary. Upon saving the updates by selecting Save & Next, the merchant is required to re-upload the corresponding updated documents for validation and record-keeping. Once the Merchant Onboarding Form has been uploaded, the relevant fields will automatically be frozen after one (1) hour
📊 Overview
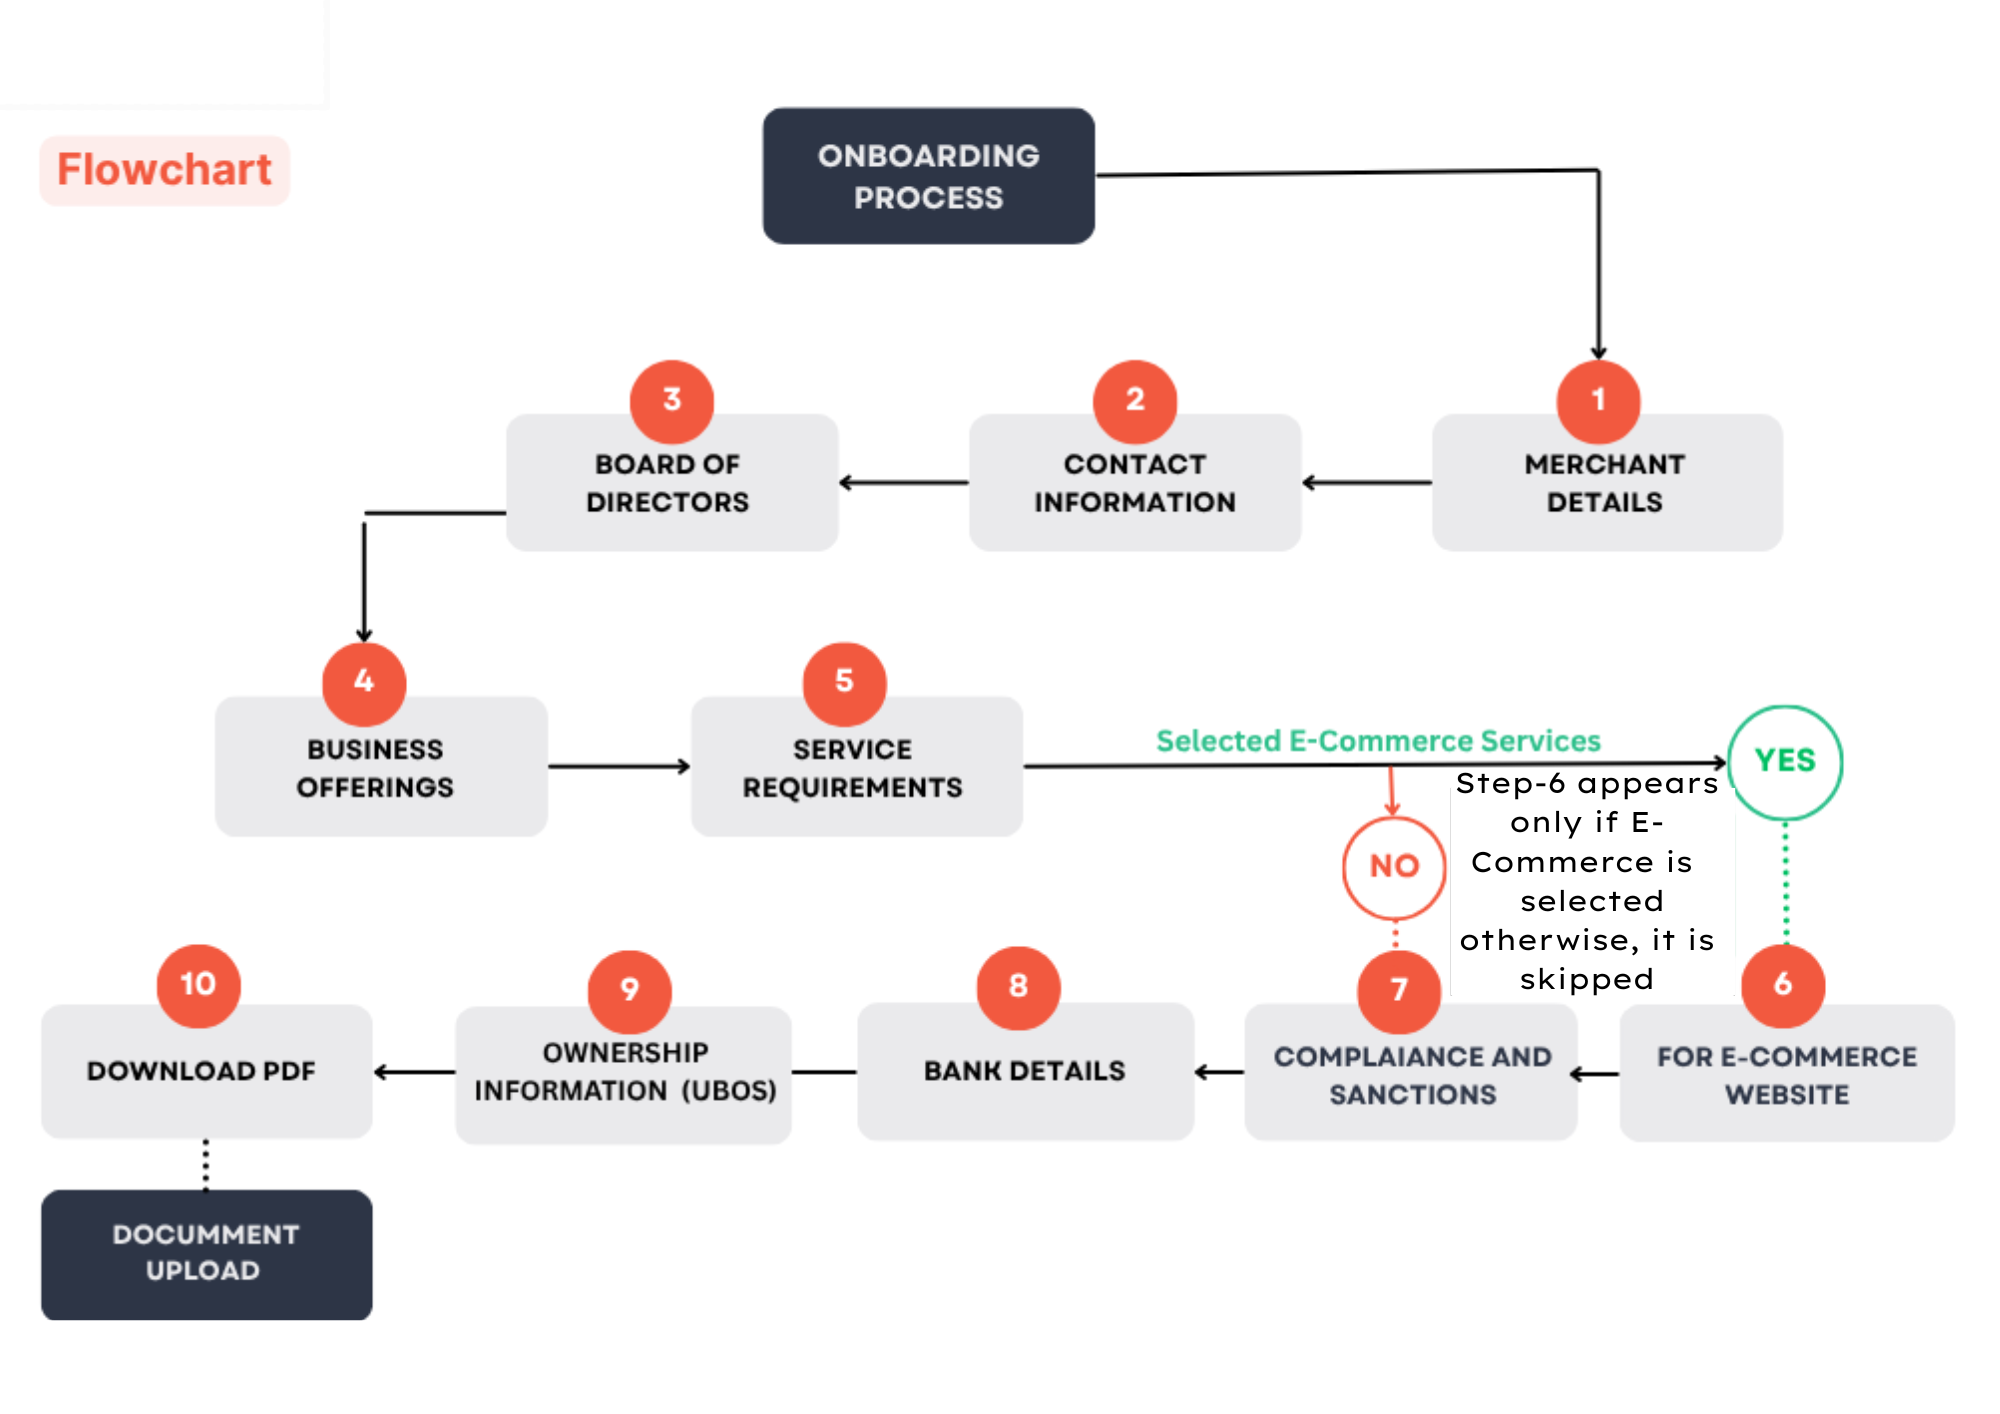
The following flowchart is designed to simplify the onboarding process for merchants. Use this visual guide to easily understand each step of the journey
Note: Step 6/10 (For E-Commerce Website) appears only when the merchant selects 'E-Commerce Services' as a service in Step 5/10. If not selected, Step 6 is automatically skipped, and the flow moves to Step 7.
📝 Step 1: Merchant Details
Capture basic business information that forms the legal identity of your company. Ensure accuracy as this forms the legal identity of your business.
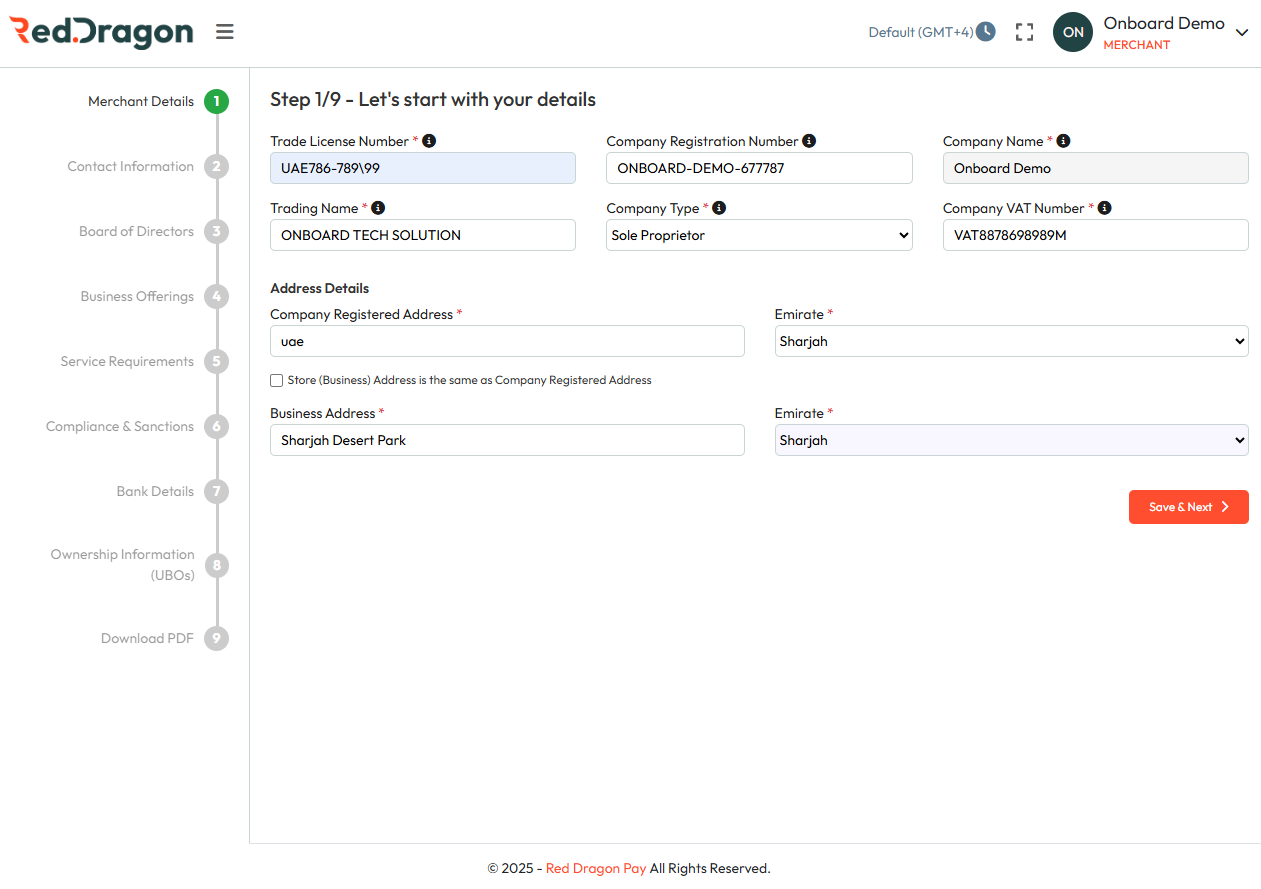
✅ Click Save & Next to proceed.
📞 Step 2: Contact Information
This section collects essential contact details for your company, key personnel, and authorized signatories. Please follow the instructions below to complete each field accurately.
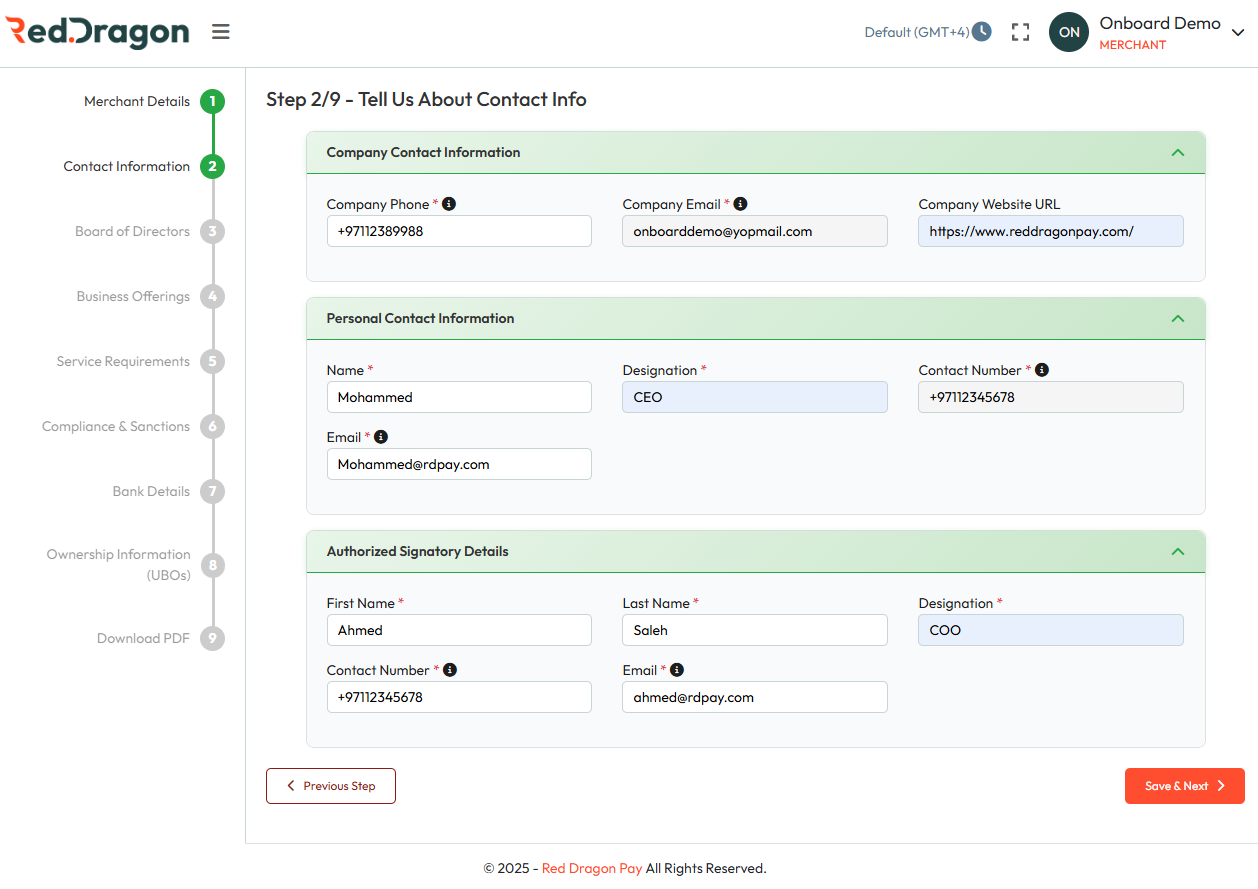
Tips:
- Double-check for accuracy
- Use official, up-to-date info
- Ensure email addresses and URLs are correctly formatted.
👥 Step 3: Board of Directors
List of the details of company directors
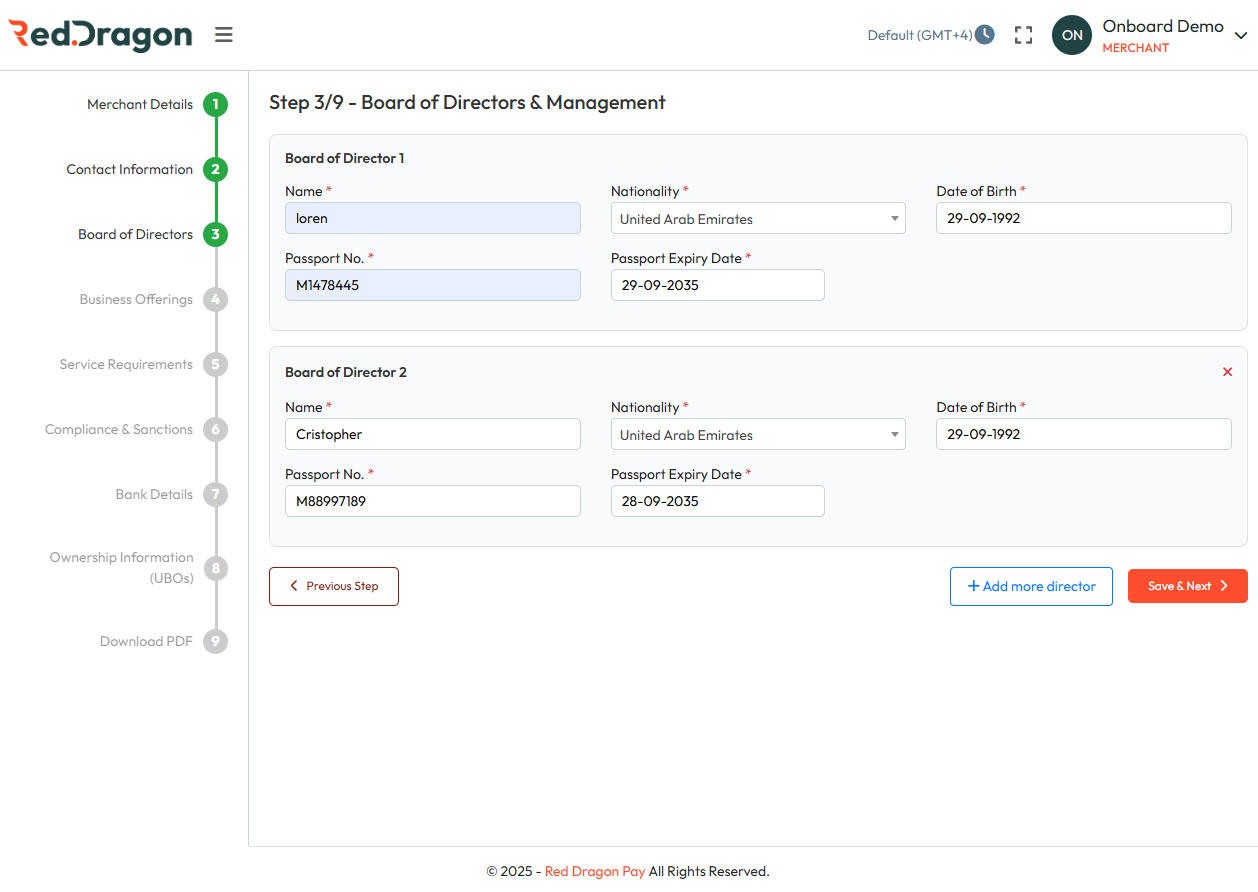
🧩 Use Add more Director to include more than one director else save and continue to the next step.
💼 Step 4: Business Offerings
This section gathers key details about your business operations and sales expectations.
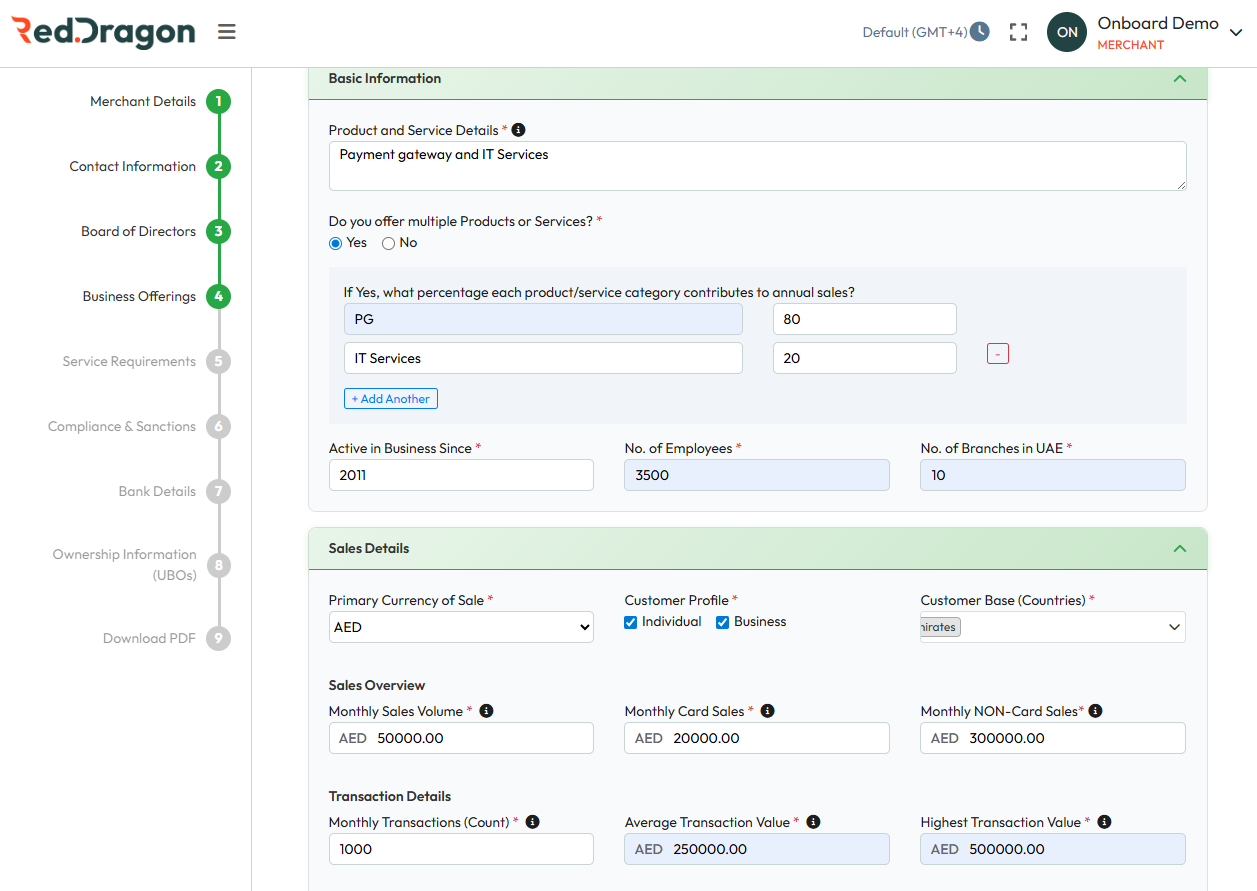
Tips:
- Ensure all entries are accurate and up to date.
- Clearly state what you offer (e.g., Payment Gateway, IT Services).
- If multiple services, add each and the % they contribute (total = 100%)
- Choose the main currency (e.g., AED).
- Enter expected monthly turnover and sales (card/non-card).
- Use consistent formatting for emails, URLs, and numbers.
- Percentages should total 100% where applicable.
- Save your progress using the Save & Next button.
🧾 Step 5: Service Requirements
This section allows you to specify which products and services you wish to use from the company. It also collects estimates of your domestic and international transaction volumes.
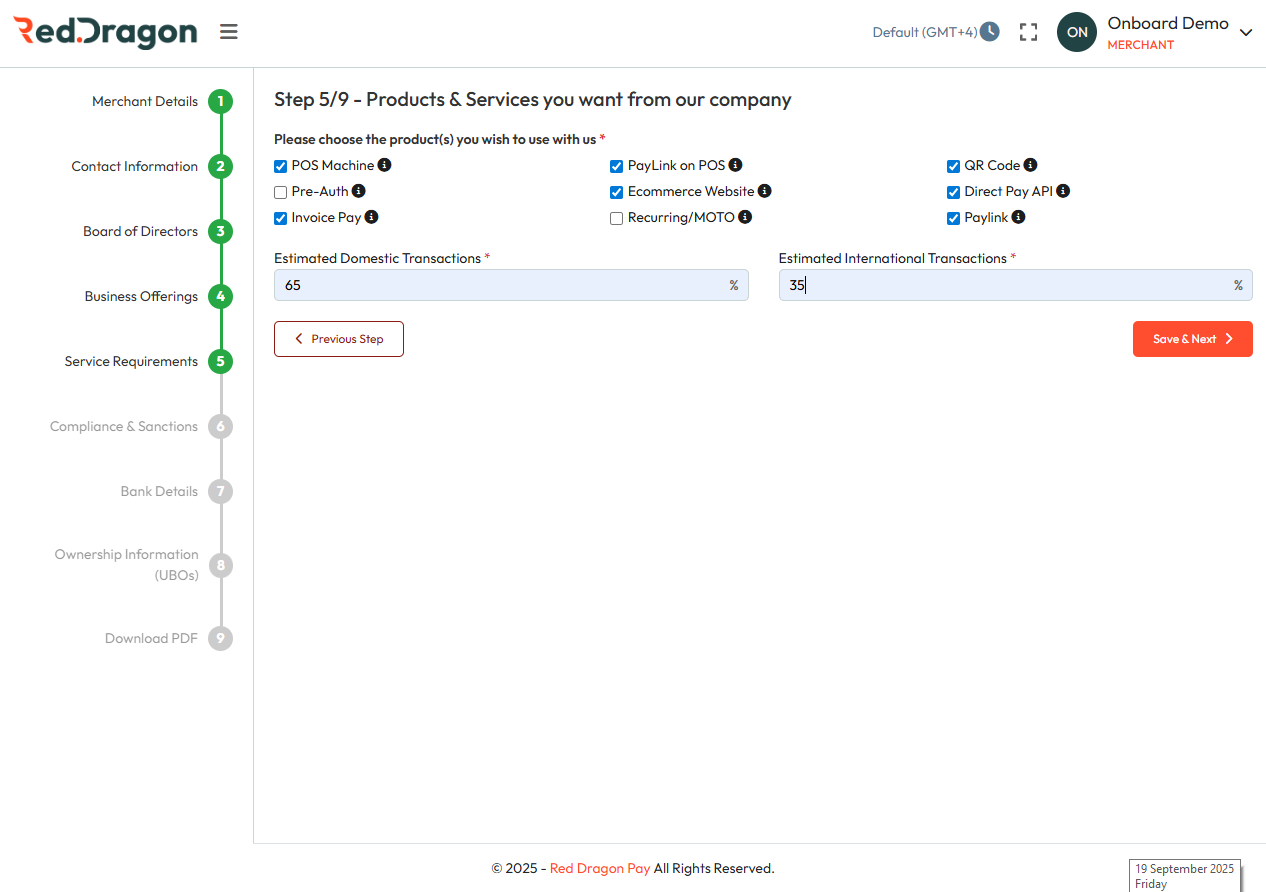
✅ Tip:
- You can select multiple options if your business requires a combination of services.
- Select only the services relevant to your business model.
- Use realistic estimates based on current or projected transaction data.
- Review selections before proceeding to the next step
🌐 Step 6: E-Commerce Website (Conditional)
This Step appear only if E-Commerce business type selected in step 5. If "E-Commerce" is selected, the merchant will proceed to Step 6 to complete related compliance and technical information. If not selected, Step 6 is automatically skipped, and the flow moves to Step 7. The presence of this step also affects the onboarding documents generated.
This section collects details about your e-commerce setup, security measures, and customer protection policies. Please complete each field accurately to ensure compliance and smooth onboarding.
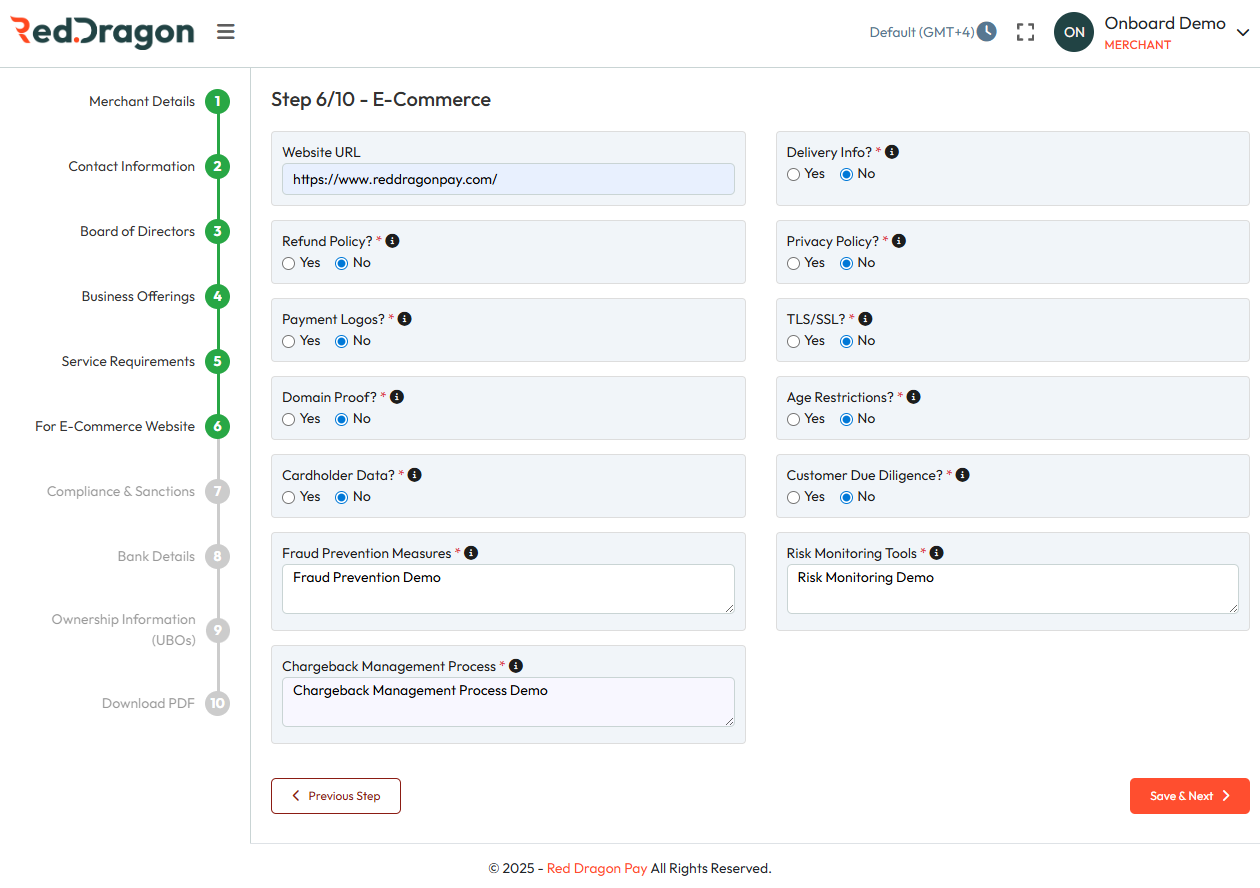
Tips:
- Ensure all policies and security measures are active and documented.
- Use accurate URLs and policy names.
- If unsure about any field, consult your IT or compliance team.
⚖️ Step 7: Compliance & Sanctions
This section ensures your business meets legal and regulatory standards. It helps the payment provider assess risk and verify that your operations comply with international laws.
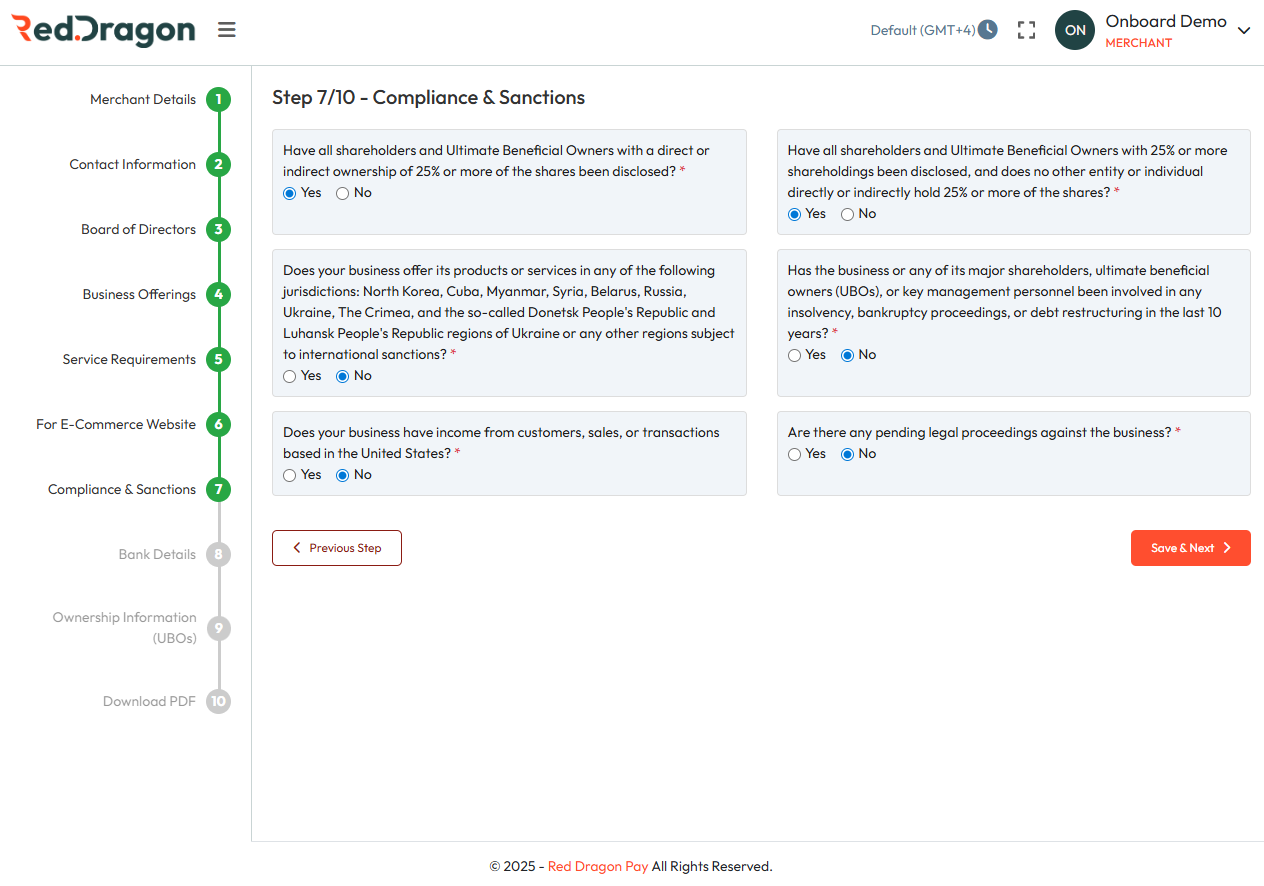
Tips:
- Be honest
- Keep necessary documents ready
- Seek legal help if needed
🏦 Step 8: Bank Details
Provide bank info: name, account number, IBAN/SWIFT as applicable.
- Add Bank Name, Account Name, Account No.
- Include IBAN/SWIFT if needed.
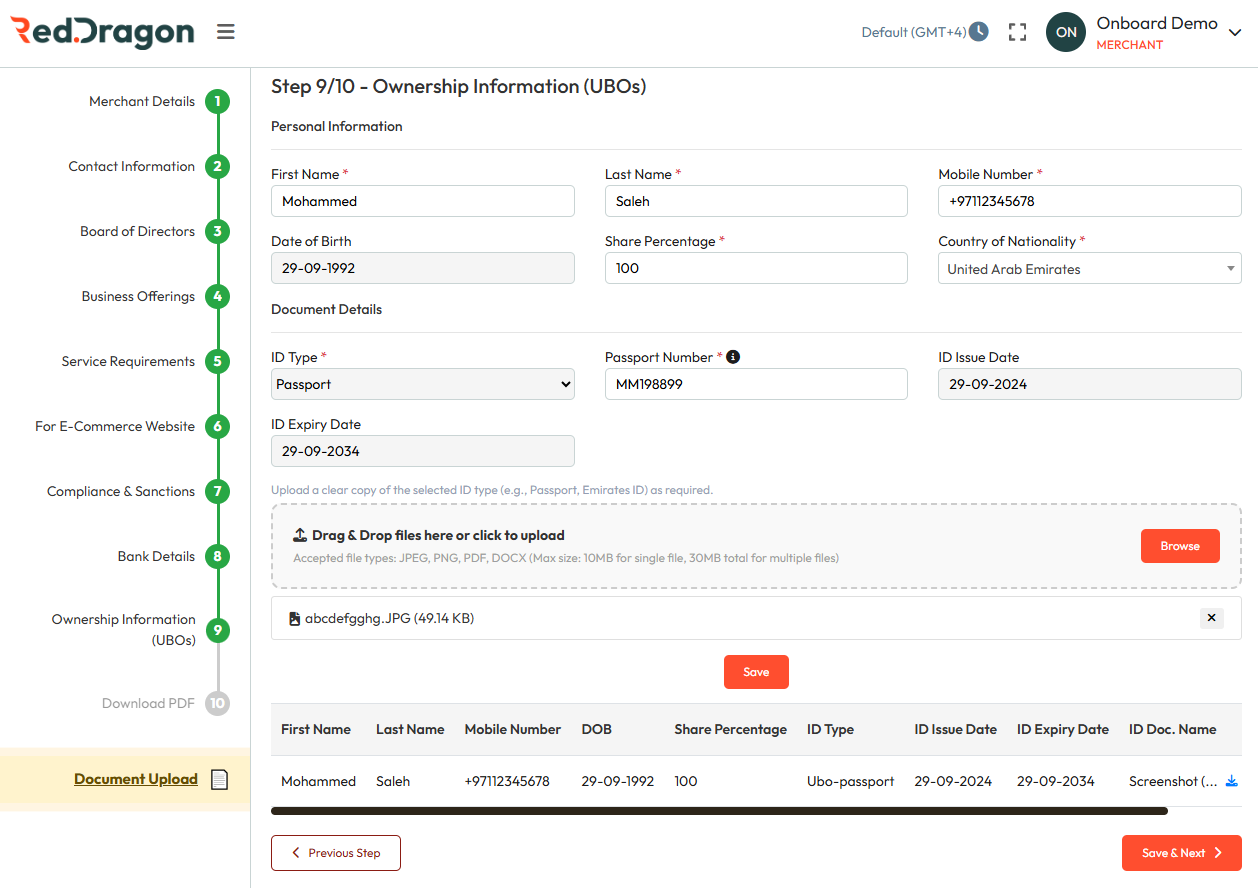
👤 Step 9: Ownership Information (UBOs)
The UBO section is designed to capture details of individuals who ultimately own or control the entity.
Tips:
- Full name, mobile, DOB, ID and ID type and image proof.
- Share % must total 100%.
- Select ID type, upload ID.
- Add all owners with 10%+ share
📄 Step 10: Download PDF
You can download a compiled summary. Click the PDF Download button. Verify All the information before downloading.
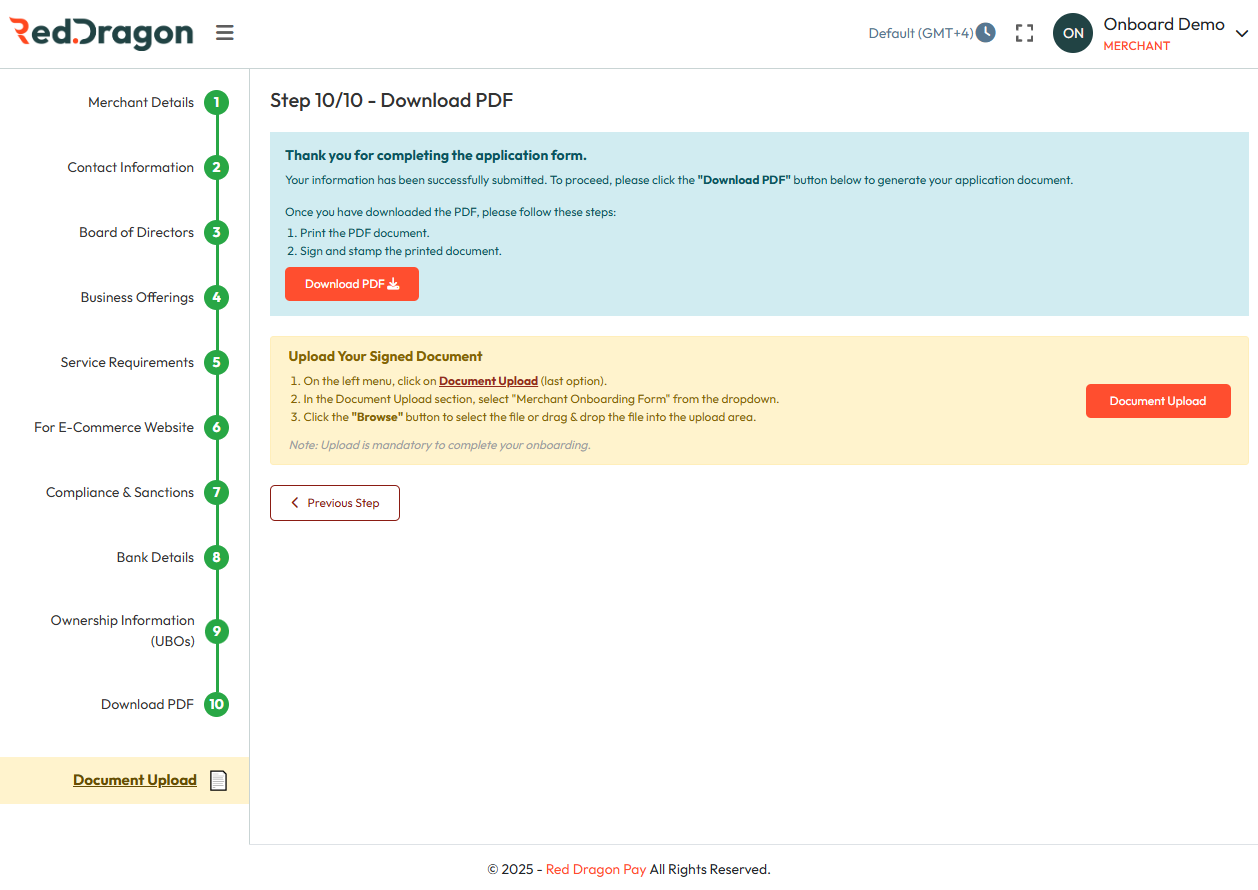
✅ Click the PDF Download button after review.
🗂️ Step 11: Document Upload Section
-
Download the Required Form:
- Click on "Download Merchant Onboarding Form.
- Fill out the form completely and sign it and stamp it.
-
Select Document Type:
- Use the dropdown menu labeled "Select Document Type".
- Choose the appropriate document type (e.g., Merchant Onboarding Form).
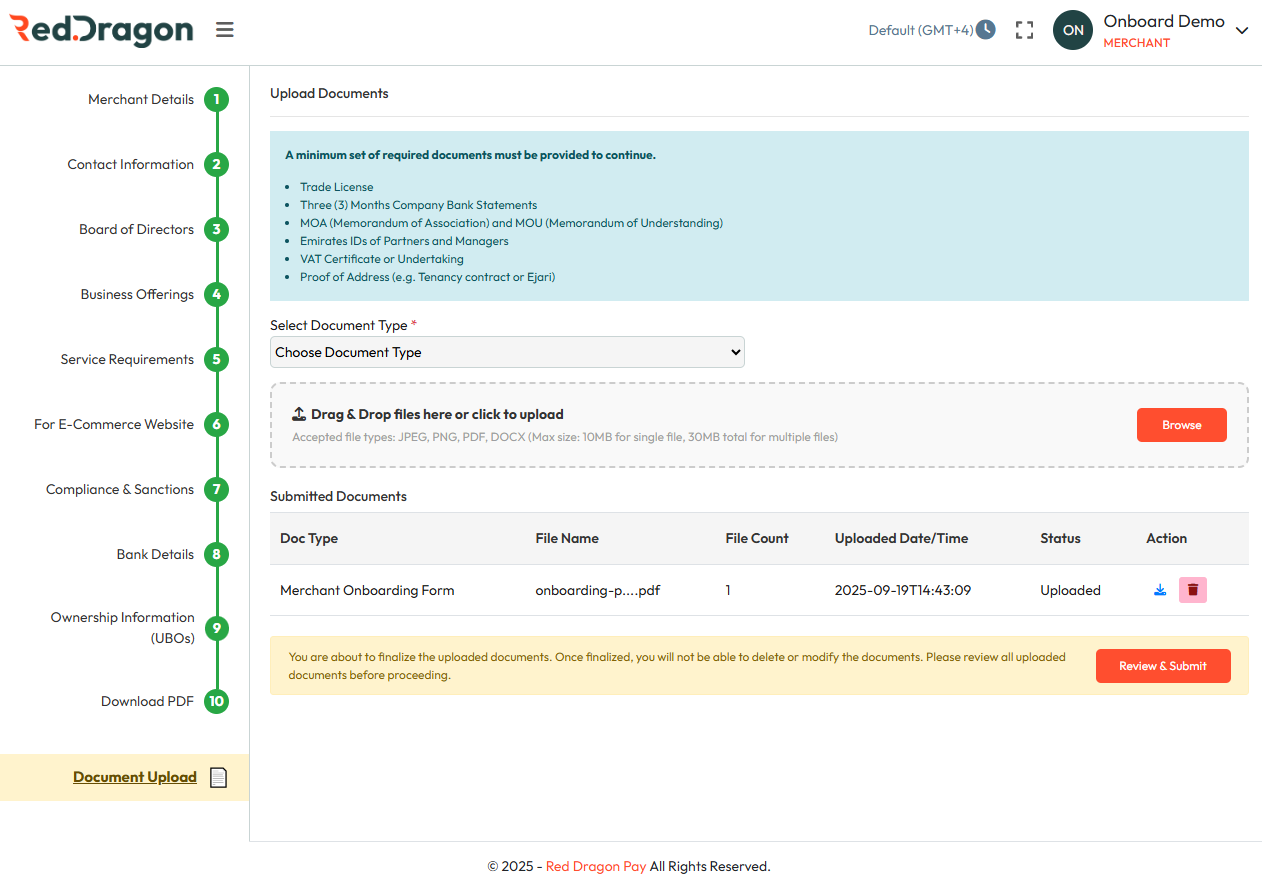
- Upload the Document:
- Click "Browse" or drag and drop your completed form into the upload area.
File Requirements:
- Formats: PDF, JPEG, JPG, PNG, DOCX, DOC, XLS, XLSX, PPT, PPTX, GIF, BMP, TIFF, HEIC, TXT
- Max size: 10MB per file
- View Submitted Documents
- Once uploaded, your document will appear in the Submitted Documents table.
- The table displays:
- Document Type
- File Name
- File Count
- Upload date/time
- Status
- Actions options(View or delete)
✅ Ensure the uploaded document is complete, signed, and meets the format and size requirements.
Note: Please click the Review and submit button so an email will be generated, and it will notify the admin